What is a SmartLink?
SmartLinks allow you to easily link one application (Retrieval, Report, or Maintenance) to any other application, passing key data automatically. The benefits of this are many, including:
- You can create applications that allow users to drill from an order header table to order detail records.
- View a list of products and maintain records based on the value you selected.
- Useful when making Dashboard Applications.
Creating a SmartLink
To create a SmartLink application, you will need (at least) two applications: The calling application and the receiving application. While it may seem backwards, you should always create the receiving application first, then create the calling application last.
- When your SmartLink calls the receiving application, it will examine what dimension fields of the receiving application. Only fields that are dimension keys in the receiving application will be passed.
- Be sure to include Dimension keys that exist in both applications. If they have different names, be sure to set up a Synonym.
- If no matching fields can be found, no values will be passed along with your Smartlink.
- Compile your application, and make note of the application type and application number as we will use this information in our next step.
Next, let’s build the calling application.
- Create or select an application that has one or more fields that match the dimension keys of the receiving application. The fields in the calling application do not need to be dimension keys, they simply need to exist.
- Click the SmartLinks button within Application Options and click “Create Smartlink”. Click either Retrievals, Reports, or Maintainers (this depends on the type of application you built in Step 1).
- Use the navigation options to find the application you made in Step 1. Click the green “arrow” icon.
- Recompile your application and overwrite the HTML.
At runtime, your calling application will contain a link in the right-most column of your table (bottom-most if it is a Single Row Data list template). Clicking on it will pass all of the values of the dimension keys of the receiving application where they existed in the calling application.
Real World Application
You wish to see Sales History Data in a Multiple Row Data List Retrieval. The problem is that the file contains millions of records and you know that you only ever want to see data for one particular customer at a time. You decide that you want to first show users a screen with all current customers. From here, the user should click on a customer, then they will be taken to all the Sales History data for that customer only.
- Build your Sales History Retrieval. You must use the Customer Number field as the dimension. The reason you must do this is because m-Power will only pass data from key fields to an application. Build the retrieval.
- Next, build your Customer look-up retrieval over your Customer Master table. Here the dimension key does not matter because this is the calling application. Simply be sure that the customer number has been included in this application.
- Add a SmartLink from the customer look-up to the Sales History application. m-Power will automatically know to pass the Customer # because that field is the key field in the receiving application. Compile the look-up.
Creating SmartLinks directly in m-Painter
To begin click on the text you wish to become the clickable link. Then, in the element panel, select “Smartlink”

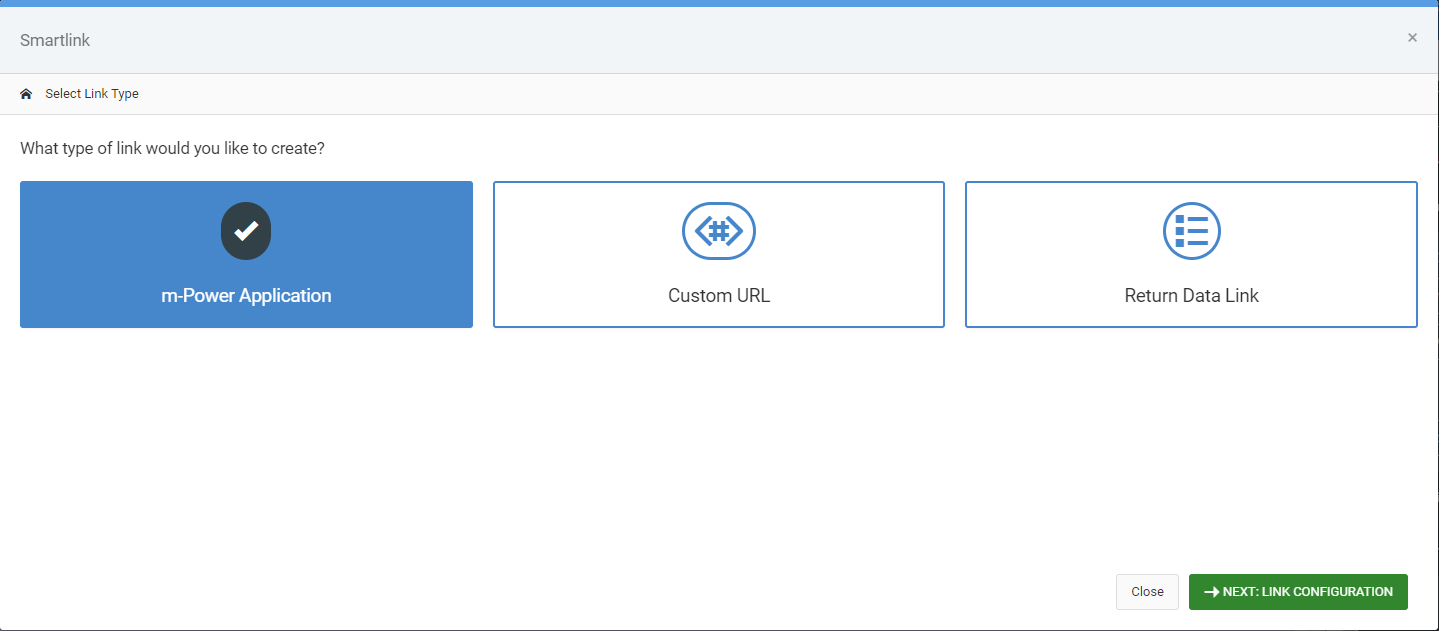
Link Type
Your first decision will be choosing what application you would like to SmartLink to. Options include:
- m-Power Application — This will be the most used choice. Select this if you want to link one application to another.
- Custom URL — This this link if you wish to link out to a non-m-Power application.
- Return Data Link — Use this option if you are creating a Lookup window Return Data. More info on that feature here.
Link Configuration
After selecting where you would like to link to, click link configuration. Depending on what type you chose in the previous screen, your options will differ:
- m-Power Application — Select the application you wish to link to. Notice you can navigate the tabs to see other applications, as well as choosing a different dictionary on the right hand side
of the modal window.
After selecting the link, you are brought to a secondary screen where you can map fields from your application to the application you are linking to:

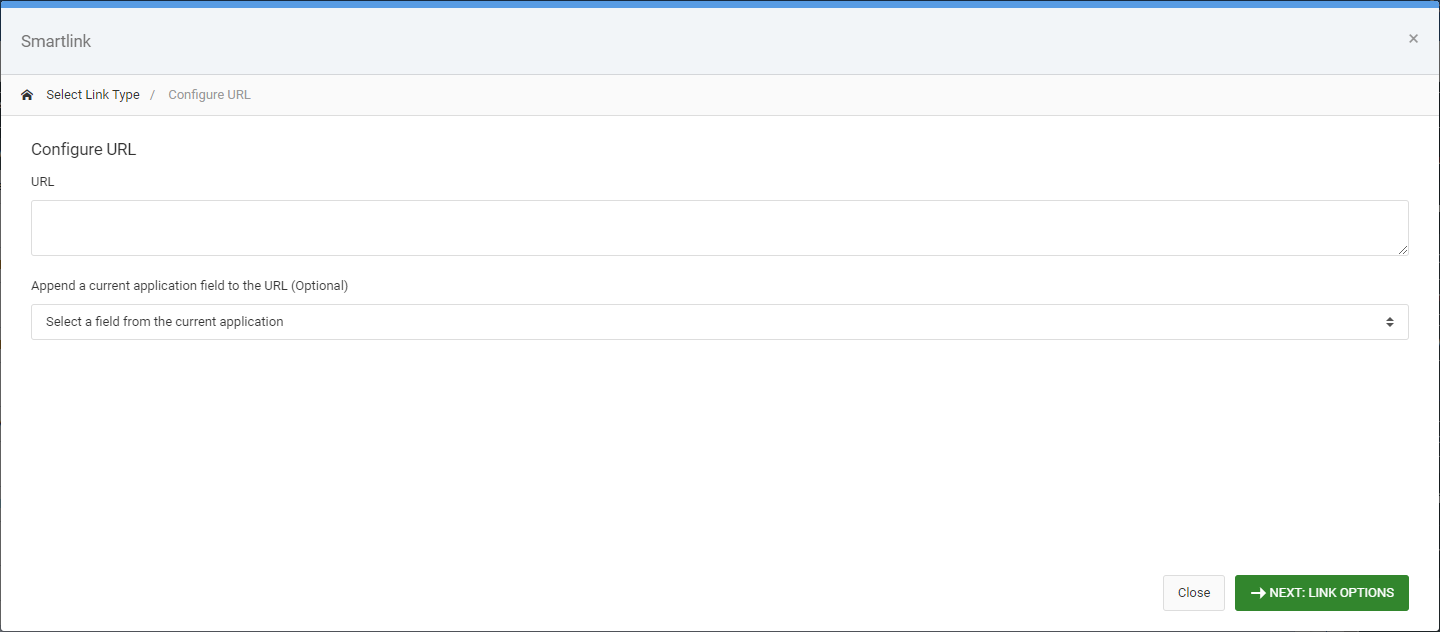
- Custom URL — Specify the URL you wish to redirect to. In the event you wish to pass a parameter from the row the user clicked on, choose a value from the “Append a current application field” and m-Painter will add it to existing URL.
- Return Data Link — This feature has no Link Configuration. You will automatically be brought to Link Options.
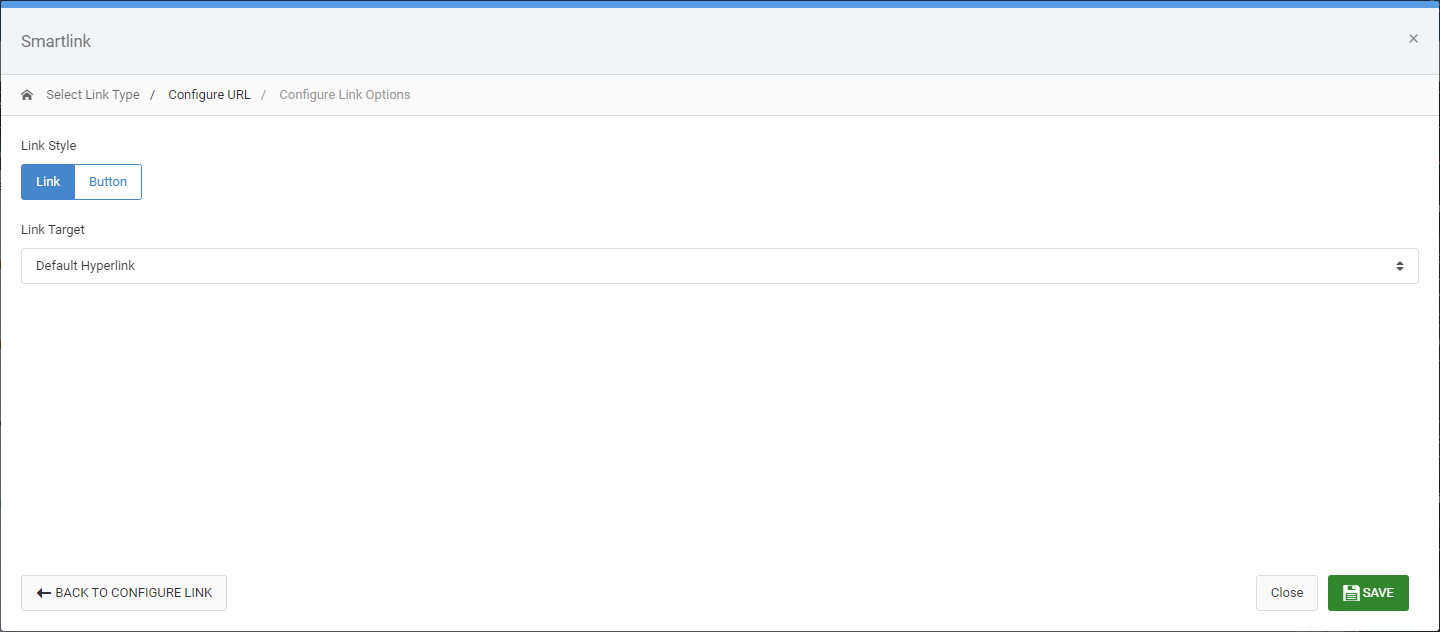
Link Options
The final step for all SmartLinks is to specify Link Options. All link type share this screen..
Choose the style of how your link will look as well as controlling where/how the link will open.