Tomcat 9 offers m-Power customers the latest security, performance, and stability improvements.
As such this document is designed to give system administrators step by step instructions on how to upgrade from Tomcat 7 to Tomcat 9.
Before we begin, please note these instructions are designed for standard installations. If you are utilizing any of the following, please consider engaging m-Power in a services agreements for us to do this conversion for you as we are familiar with these types of customized solutions:
- Load Balancing
- Clustering
- SSL
- mod_jk to communicate between Tomcat/Apache
- Custom Contexts
- Reverse Proxies
Windows Instructions
Uninstall existing Tomcat7 services
- Stop existing Tomcats
- Open CMD mode as Administrator
- Navigate to C:\program files\mrc\development\m-power\tomcat\bin
- Type
service remove TC7DEV - Navigate to c:\program files\mrc\production\m-power\tomcat\bin
- Type
service remove TC7PROD - Repeat for any other services you may have installed
Install Tomcat
- Download the Windows version Tomcat 9 from mrc here
- Rename existing tomcat folder to tomcat 7
- Unzip downloaded file into c:\program files\mrc\development\m-power\. When completed you should have a c:\program files\mrc\development\m-power\tomcat folder
- Move tools.jar from tomcat7\lib to tomcat\lib
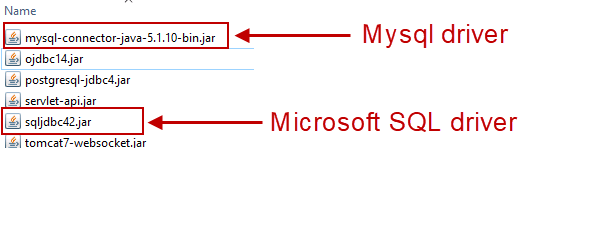
- If you connect to MSSQL or MySQL, move over the necessary jar files from tomcat7\lib to tomcat\lib
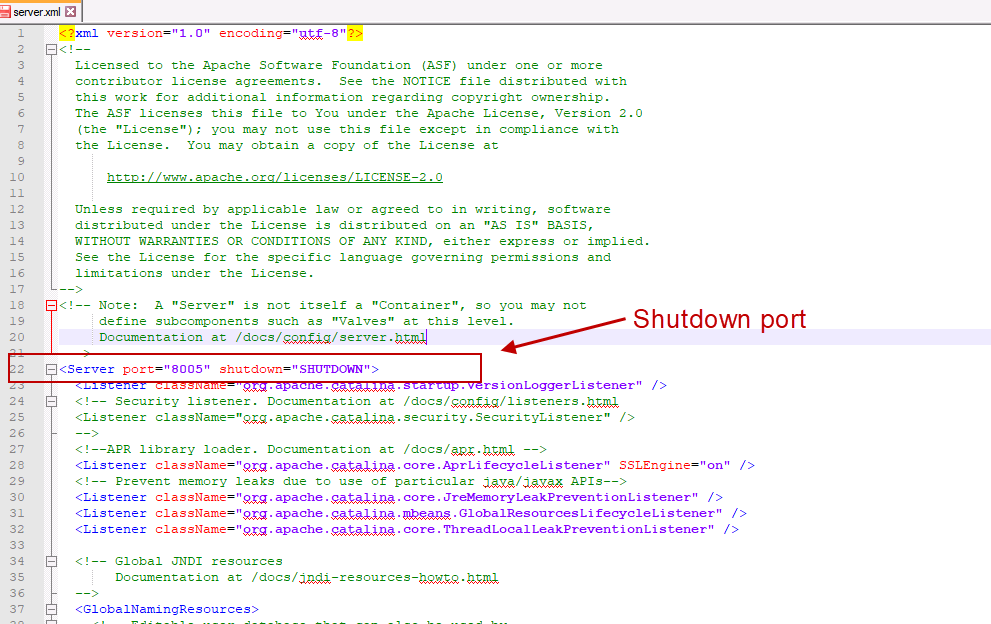
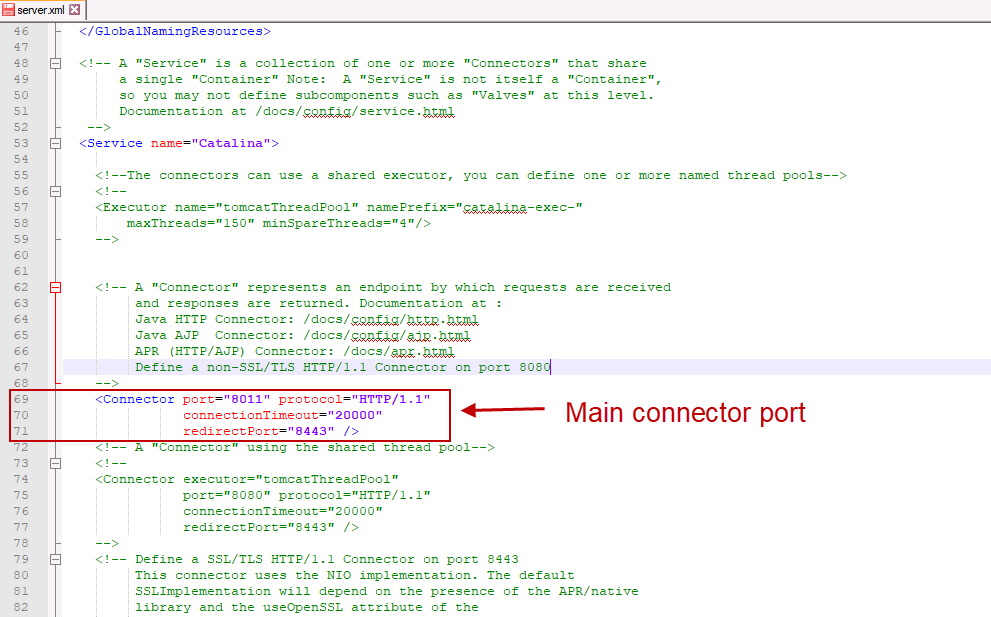
- Examine server.xml in ..\tomcat7\conf. Specifically, note the shutdown port, connector port, and contexts. Ensure these changes are made within the server.xml in tomcat\conf.

Repeat the above process for your production instance (as well as any other instances you may have).
Install Tomcat9 as a service
- Open CMD mode as Administrator
- Navigate to c:\program files\mrc\development\m-power\tomcat\bin
- Type
service install TC9DEV - Type
tomcat9w //ES//TC9DEV - In the Java tab set the JVM to the appropriate jvm.dll (found in a path similar to C:\Program Files\Java\jdk1.8.X_XX\jre\bin\server\jvm.dll
- In Java options, add the following:
-Xmx512m
-Xms512m
(Change the above to match your usage needs) - Be sure that the Initial Memory Pool, Maximum memory pool, and Thread stack size inputs are all empty
- Back in the general tab. ensure that the startup type is Automatic
- Press Start
Repeat the above process for your production instance (as well as any other instance you have)
Linux Instructions
- Download the Linux version of Tomcat 9 from mrc here
- Stop Existing Tomcat
- Rename existing Tomcat folder to Tomcat 7
- Unzip downloaded file into /m-power. When completed you should have an m-power/tomcat/ folder
- Move tools.jar from tomcat7/lib to tomcat/lib
- If you connect to MSSQL or MySQL, move over the necessary jar files from tomcat7/lib to tomcat/lib.
- Examine the server.xml in …/tomcat7/conf. Specifically, note the shutdown port, connector port, and contexts. Ensure these changes are made within the server.xml in tomcat/conf
- Ensure that the permission set to /tomcat/bin/catalina.sh allows this file to be executable
Once completed, repeat these steps for any other Tomcat instances you may running on the server (ie….development, UAT, production, etc)
Troubleshooting
- If Tomcat does not start, check the logs and see if it is complaining about duplicate entries in your web.xml file. If so, rename your /mrcjava/WEB-INF/web.xml to web7.xml. Then download this blank web.xml file into /mrcjava/WEB-INF/web.xml. Finally, run the conversion process located in /m-power named update-webxml.bat (as an Administrator) to populate the file.
- Any custom entries you made your web.xml will not be brought over in the conversion process. Instead, manually copy and paste the specific entries from web7.xml to web.xml.
- If you have any nightly processes that automatically restart Tomcat, ensure they are pointing at the new job name (applicable on windows)