Overview
The menu system in m-Power offers a centralized location for end-users to access their applications (menu options). Using the menu system, developers can easily maintain and control menu visibility for each end-user using pre-defined user roles.
This documentation will detail and provide instruction on how to utilize this menu system within your data dictionary. Please see the video walkthrough below to get an overview of what the menu system is, its benefits, and how to maximize its flexibility.
Getting Started
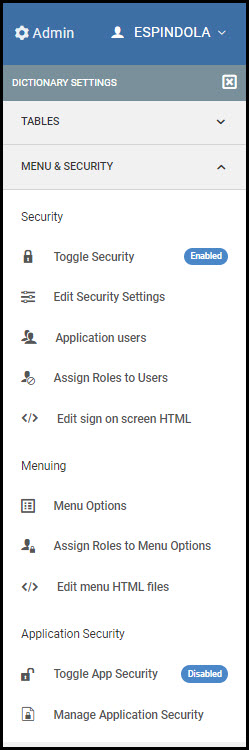
Each data dictionary in m-Power supports its own menu system. This is accessed from Admin -> Menu & Security as shown in the following image.
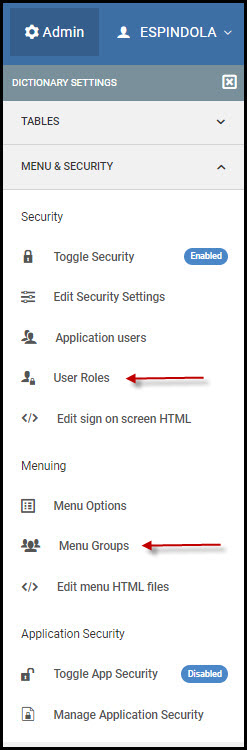
The menu system is broken down into several different components, all which work in tandem. Referring to Figure 1, the options pertaining to the menu system are explained as follows:
- Application Users – A defined list of users who are authorized to see menu options on the menu. Users are tied to roles, which defined the applications that are visible on their menu.
- User Roles – A role is a group, to which application users are assigned to. This role is then assigned specific applications that it can view on the main menu. Users can belong to multiple roles.
- Menu Options – These are the links that have been added to the menu which end-users can then see and click on at runtime to access their applications.
- Menu Groups – Menu Groups provide hierarchal organization to menu options. This allows developers to group multiple menu options under different groups, such as “Sales”, “Data Search”, “Forms”, etc. The menu system supports Major, Minor, and Sub-Minor Groups. These groups can be defined, ordered, and set up hierarchically to control which groups are owned by other groups.
- Manage Application Security – This optional settings lets you control which users (via their roles) shall be allowed to access which applications in your dictionary.
Each area will be elaborated on in further detail.
Application Users
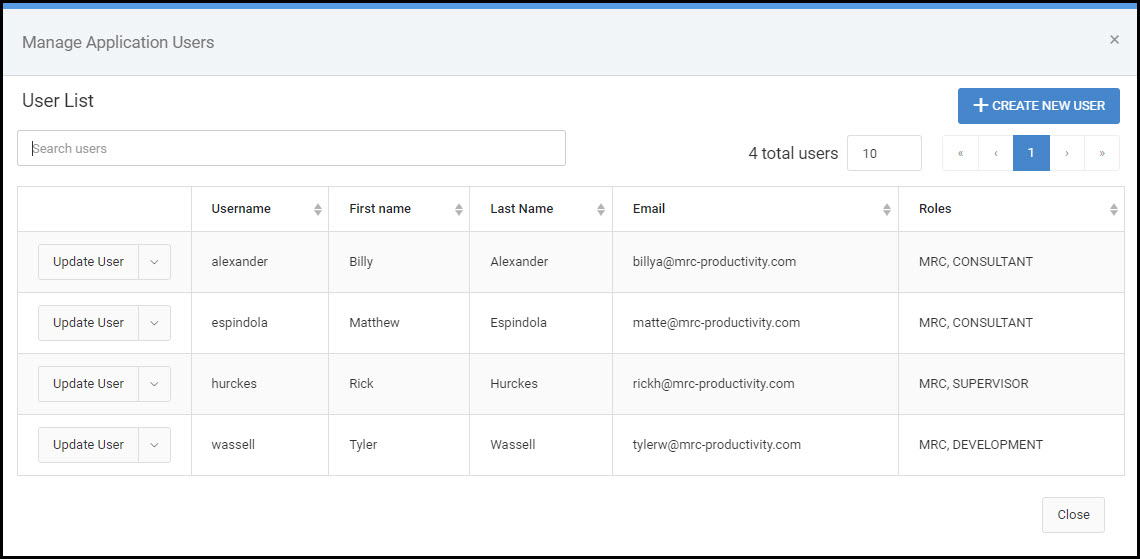
To add a new application user, press ‘+ Create New User’. The username is the only required field in the form. If your are securing end-user sign-on via a database table, you will want to enter the password here. The first name, last name, and email are not necessary, but can be entered for your own reference.
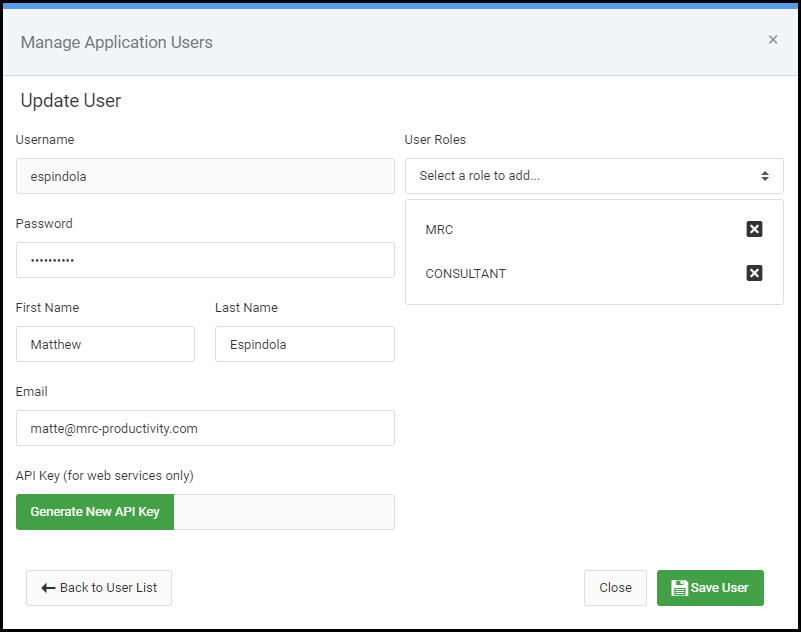
Access on the menu is not controlled directly by user; instead it is dictated by a user’s assigned role(s). Via the ‘Update User option’, any existing roles can be assigned to the user as shown via Figure 3. Roles cannot be created here, but rather only assigned to the user (roles are created in User Roles).
User Roles

With Application Users created, navigate to the User Roles screen. Roles can be created by selecting “+ Create New Role”.
After a role is created, pressing “Update Role” on the role opens a screen (as shown in Figure 5) that provides the ability to quickly assign several components to the role, including: application users, menu options and application security via the provided dropdown boxes. Navigate to the applicable tab to assign the selected element to this role. When completed, press “Save Role.”

It is important to mention that roles can also have child roles assigned to them, which allows for creating role hierarchy. Using the roles from Figure 4. as an example, lets say that:
- CONSULTANT is a child role of SUPERVISOR.
- SUPERVISOR is a child role of MANAGEMENT
This implies the following:
- Users who belong to the MANAGEMENT role will see any applications assigned to MANAGEMENT, SUPERVISOR, and CONSULTANT.
- Users who belong to the SUPERVISOR role will see any applications assigned to SUPERVISOR and CONSULTANT.
- Users who belong to CONSULTANT role will see only the applications assigned to CONSULTANT.
As can be seen, implementing role hierarchy can greatly improve the efficiency of assigning users to roles, especially in larger menu systems with many users.
Manage Menu Options
The Menu Options screen shows a list of all applications that have been defined for the current dictionary’s menu. For an application to appear as a hyperlink on the menu, it must be defined as a Menu Option.
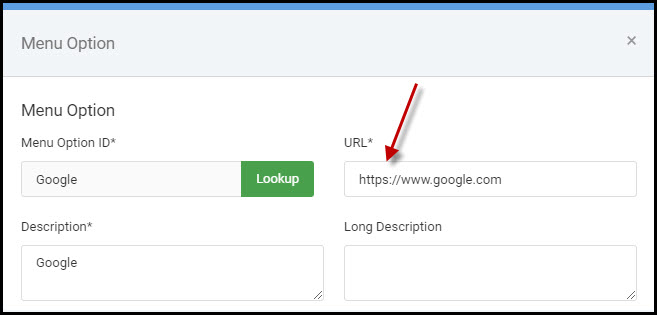
After pressing “Add New Menu Option”, the following screen (below) will appear.
If adding an m-Power application within the current Data Dictionary, click ‘Lookup’ as shown in Figure 6 and from the popup window that appears select the desired Retrieval/Report/Summary/Maintainer application. Selecting an application will auto-fill various inputs on the screen, such as the Menu Option ID, Description, and URL.

You may also add external links (non-m-Power applications) to as Menu Options. In these cases, be sure to fully qualify the URL with http:// or https://, as required by the destination site:
The other options available when configuring a Menu Option are explained in detail, as follows. Options highlighted in red are required, whereas the rest are optional:
- Menu Option ID (required) – The unique ID value attributed to your Menu Option. Two menu options cannot have the same value.
- Description (required) – This will be the text your end user sees that will make up the menu link
- Sequence #– Respective of its group, applications within the same group will display in numeric order of their sequence number. Applications with the same sequence number will be listed alphabetically.
- Title – Any text entered here will be displayed as title text for your end user when they hover their cursor over the link.
- Font Awesome Icon – Add a small icon to the left of text based menu. Click the “Icon’ button to pick from available options.
- Alternate Link Text – Only used on the Menu Card option, will serve as the action link.
- URL (required) – Controls where the user is directed after executing the link. This can be relative or static.
- Long Description – Used only in the Card Menu and replaces the description.
- Group – Menu Options typically live in Menu Groups. A group simply offers a way to categorize and organize your menu options Menu Groups are covered in more detail in the next section.
- Image URL – If you prefer to use your own menu icon, you can include it here. The image will be placed to the left of the link.
- Class – Any text entered will be automatically applied to link/anchor tag, allowing you to control the CSS styling.
- Roles (required) – For a link to appear on the menu, a role must be given access to this menu option. More than one role can be defined per menu option. All users of the role provided will have access to see this menu option. Developers can choose an existing role or create a new one. Alternatively, developers can choose to assign roles on the “Manage Roles” screen.
Once completed, press Save Menu Option at the bottom of the window.
Manage Menu Groups
Menu Groups provide developers a way to categorize and organize Menu Options on the menu in various groups. Below is an example of a menu with the three different types of Menu Groups: Major, Minor, and Sub-Minor.
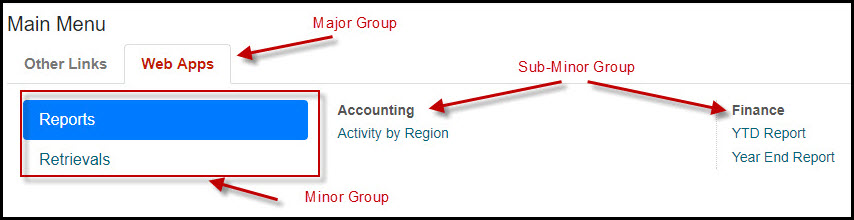
Notice that the hierarchy of groups goes by Major -> Minor -> Sub-Minor.
Major Group are listed as tabs across the top of the page. Minor groups are nested with Major groups, listed on the left-hand side as buttons. Finally, Sub-minor groups are listed as column headings within the appropriate Minor group.
To manage these groups, click on the “Update Group” on an existing group or add a new group via the “Add New Menu Group” button.

The inputs on the screen are explained in greater detail, as follows:
- Name (required) – Indicates the name of the group. This will be seen by your end-user on the menu.
- Type (required) – Select if you would like to create the group as a Major, Minor, or Sub-Minor.
- Assign group to parent – If a Minor or Sub-Minor, the appropriate parent group must be selected.
- Order – the order allows you to control the order of this group, relative to its peers. In the event that two groups of the same type share the same order, the group will be ordered alphabetically.
- Font Awesome Icon – Press ‘Icon’ in order to browser a list of icons. The selected icon will appear next to the group name on the menu.
Upgrading to this Menu option
As mentioned at the beginning of this document, if your options within the Menu & Security menu do not match what is shown in this documentation, you may follow this process to upgrade your menu.
- On the m-Power server, and navigate to …./development/m-power/mrcjava/WEB-INF/classes/DD, where ‘DD’ is the name of your Data Dictionary where the menu lives.
- Search for all the files in this directory that start with the name mrcmenu. Copy these files for backup purposes to C:/temp.
- Delete all the mrcmenu files from the /DD directory.
- Back in your internet browser, within m-Power, click Admin -> Legacy Admin -> Users Menu & Security.
- This will create all the new menu files as well as convert over your existing data.
- When the interface looks like this, you will have your visual confirmation that menu has been upgraded:
Before
After
Manage Application Security
This step is optional and only used if you need to restrict application access for certain roles. To do so, click the “Secure New Application” button from within the “Manage Application Security” screen. Here specify which role should have access to which application.
More information about this feature can be found here.
Other Customizations
The menu system allows for two different types of menu options:
Standard Link Based Menu – This option is largely explained above as it is the default option. The output of this option looks like the following: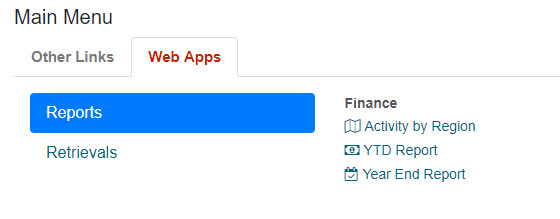
The alternative menu design available to you is the Card Based Menu. Its output looks like this: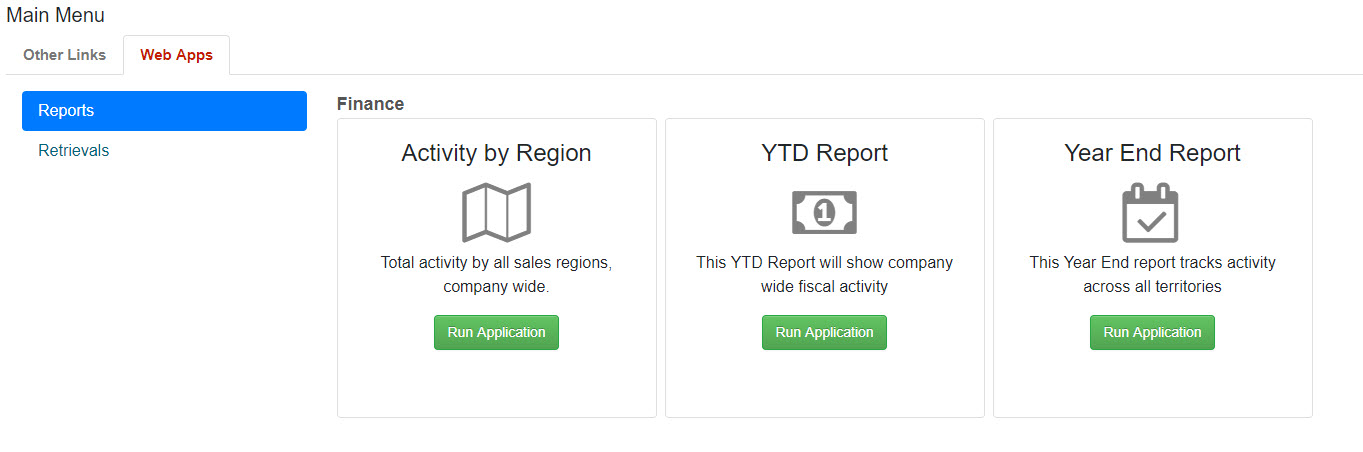
To configure which output is displayed, go to Admin Menu -> Edit Dictionary Files -> Servlet Properties.
**Changing this property requires that Tomcat is restarted
Developers also have the ability to customize the navigation bar menu. Valid choices are the Header Tree Menu and the Header Mega Menu:
An Example of the Header Tree Menu would be: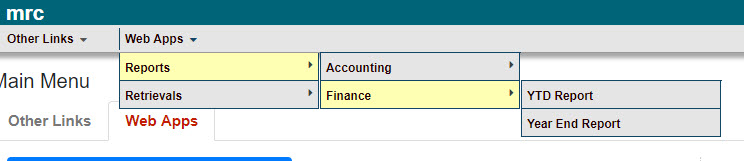
Notice that in the above example, the user would have to hover on each parent element to view its child element. “Web Apps” is the parent element, where “Reports” is the Minor Group, “Finance” is the Sub-Minor Group, and YTD Report & Year End Report are the specific Menu links.
The alternative option for the navigation menu would be the Header Mega Menu. An example of this can be found below: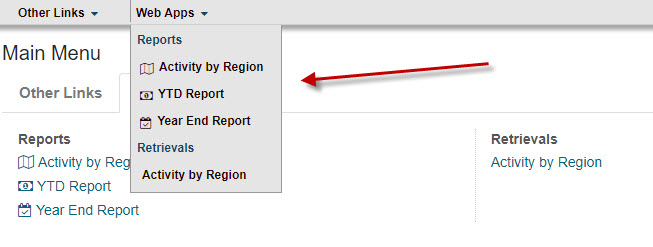
In this case, “Web Apps” is the Major Group, “Reports” and “Retrievals” are the Minor Groups. Then, every other option is a valid link.
This option is particularly useful for customers who would like to see all of their menu options under a single Major group at one time.
The Header Mega Menu is not compatible with Sub-Minor Groups. Any menu option that has a parent of a Sub-Minor Group will be omitted from the menu.
**Any changes to the servlet properties file will require Tomcat to be restarted
Click here to learn how to promote Menu data to a separate production database.