Configuring m-Power for the AS400
While m-Power ships to run directly from a Windows Operating System, setting up the configuration to run on an AS400 is straightforward and simple. The following instructions will walk you through the entire m-Power installation for the AS400.
Download the m-Power software
- The software can be located here.
- For convenience, save the file in c:\temp.
Move the m-Power software to your AS400
- The easiest way to do this is via FTP.
- Click Start > Run. In the open box, type the letters “CMD.”
- A black window will open, type the following:
FTP 999.999.999where 999.999.999 is the IP address to your AS400.- You will now be prompted for your AS400 username and password.
- Type
cd /(Note: There is a space between “cd” and “/”) - Type
binary - Type
lcd c:\temp - Type
put m-power.zip - Type
quit - Type
exit - From your iSeries 5250 session, type
QSH, to get into the QSHELL environment. - Type
cd /(Note: There is a space between “cd” and “/”) - Type:
jar -xf m-power.zip– This will extract your m-power.zip file into a folder named m-power. When you get a $ sign returned, your iSeries should be done uncompressing this file and m-Power will have been installed successfully.
Install the m-Power license file
- You should have received an email from mrc with a file name mrclicense.txt. If you have not, please contact us at 630.916.0662 for assistance.
- Copy the file to your AS400 and place it in the following directory: /m-power/proddata/conf
Configure Tomcat to work on the AS400
- Open the file server.xml within /m-power/tomcat/conf:
- Look for the following text, under: <!–m-power for windows/NT –>:
- <Context path=”/webapp/mrc” docBase=”C:/m-power/mrcwebgui” debug=0 reloadable=”true”>
and make it look like this:
- <Context path=”/webapp/mrc” docBase=”/m-power/mrcwebgui” debug=0 reloadable=”true”>
- Additionally, modify the following line, under
<!–mrcjava–>: - <Context path=”/mrcjava” docBase=”C:/m-power/mrcjava” debug=0 reloadable=”true”>
and make it look like this:
- <Context path=”/mrcjava” docBase=”/m-power/mrcjava” debug=0 reloadable=”true”>
Configure m-Power to run on AS400
- Open mrctool.properties in /m-power/proddata/conf:
- Modify the target_location to:
target_location=/m-power/mrcjava/WEB-INF
- Modify the classpath to:
classpath=.:/m-power/mrcjava/WEB-INF/lib/mrcjs11.jar:/m-power/proddata/lib/servlet.jar
Start Tomcat by submitting this job:
SBMJOB CMD(QSH CMD(‘/m-power/start_tomcat400.sh’)) JOB (MRCTOMCAT) JOBQ(QINTER) CCSID(37)
Note: Feel free to create your own script that will run this command rather than entering this job each time you wish to start Tomcat. Additionally, please choose the most suitable job queue. We list QINTER here as just an example. Performance will be improved by selecting a more appropriate job queue.
You should be able to test that your system was set up correctly by going to https://999.999.999.999:8011/webapp/mrc
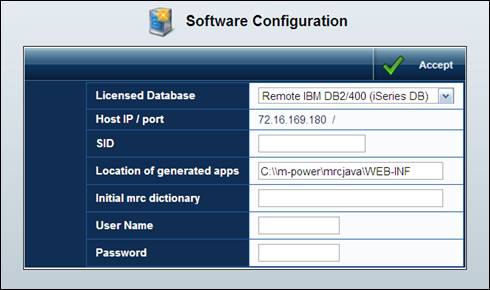
- Choose the middle link, Software Configuration
- Your screen should resemble the one listed above.
- For Location of Generated Apps, type
/m-power/mrcjava/WEB-INF/ - For Initial mrc dictionary, type
MRCTEST - For User Name, enter your AS400 User Name
- For Password, enter your AS400 Password.
- Click Accept.
m-Power is now finalizing the installation process on your AS400. The MRCAPPLLIB and MRCTEST libraries are currently being built on your AS400.
When this screen is completed you will be taken to the Database Selection Screen.
Click the Radio button for the appropriate database, and enter your user name and password. Click Accept.
Once you are logged in you will see the main menu.
Congratulations – You have successfully configured m-Power to run on your AS400.

