
User Privilege Parameters allow m-Power to store information about the user signed in at the current moment in time. These parameters are set in session, accessible throughout every application, and are saved to a user’s profile so that they are available every time a user is logged in. This is useful for controlling on screen information (like displaying a user’s name, department, or permissions), as well as to control user functionality through the use of FreeMarker and flag fields.
Jump to:
Setting up User Privilege Parameters
Using User Privilege Parameters to Control on-Screen Information
Using User Privilege Parameters to Control User Functionality
Maintaining User Privileges
Setting up User Privilege Parameters
Setting up User Privilege Parameters is a multiple step process.
- Setting up a Table to Store the User Privilege Parameters
- Creating a User Privileges Retrieval
- Adding User Privileges to the Sign on Screen
Configuring the User Rights Template
Setting up a Table to Store the User Privilege Parameters
You can use any table to store your User Privilege Parameters. By design, your table must hold your usernames. Beside that one field, your table can contain any other information you want, including (but not limited to) the parameters you want to store.
Creating a User Privileges Retrieval
Next, you must build a User Privileges Retrieval. This retrieval will use the table containing your usernames and privilege parameters, as well as the User Rights Template. When building your retrieval, be sure to select the User Rights Template, select the appropriate table, and to sequence by the Username. Keep track of the application number that this retrieval uses, as this number will be used in the next step.
Adding User Privileges to the Sign on Screen
In this step, you will be adding user privileges to your mrcSignon2.xml file. This file can be found in Admin slider –> Menu & Security–> Edit Security Settings. Open this file in text mode from the “Property Options” pulldown. Find the </savepassword> tag near the bottom of the file. Directly beneath this, add the text <userprivileges pagetype=”url”>USER RIGHTS RETRIEVAL</userprivileges>, with the appropriate substitution for your retrieval. Once finished, this should appear similar to below.
<savepassword pagetype="url">MRCWORKLIB.I00010s</savepassword>
<userprivileges pagetype="url">MRCISSUES.I00140s</userprivileges>
</group>
Using User Privilege Parameters to Control on-Screen Information
User Privilege Parameters can be used to display information about the user that is currently signed in. For instance, you could simply display the username on the screen. Alternatively, you could display any of the parameters that you’ve included in your User Privileges table. To reference these fields, simply use the FreeMarker substitution, ${rights.property(“FIELD_NAME”)}, while substituting in the correct field name.
Using User Privilege Parameters to Control User Functionality
User Privilege Parameters can be used to control User Functionality. For instance, a field within the User Privileges table may designate authority to delete records instead of just update them. This field could be used to conditionally display the delete button within a display and maintain rows maintainer. Alternatively, User Privilege Parameters can be used to create custom menus for different authority levels, or to hide sensitive information.
The below code would be used to determine whether the signed-in user is a supervisor. If the user is a supervisor, he or she will have access to the central segment of code. If the user is not a supervisor, the central code will be skipped.

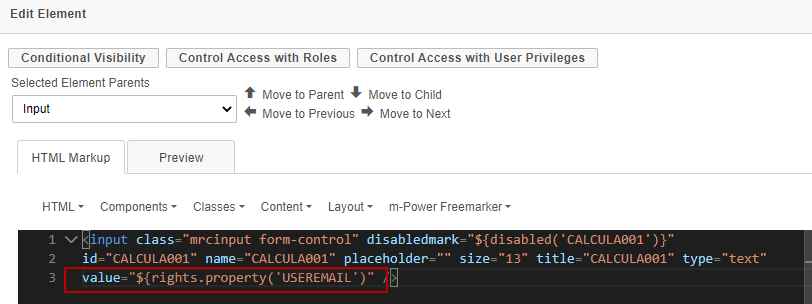
Alternatively, you may want to pre-populate a maintainer form’s inputs with user information, such as their username, email, or first and last name. To do this, open your maintainer form in m-Painter. Find the input you want to prepopulate information inside of and then right-click and select User Interface -> Edit Element. In the “value” attribute, replace the current value with ${rights.property(‘FIELDNAME’)}. For example:
Maintaining User Privileges
Once you have designed your user privileges table, you can give authority of this table back over to the user. With proper design, users can directly maintain their own parameter values. For instance, this functionality could allow users to change font sizes, background colors, or even biographical data.