
Overview
Over the past few posts, we’ve reviewed the fundamentals of CSS. In this post, we are nearing the end of fundamentals with an overview of the <div> and <span> tags. These elements are extremely important to web design, and are a must-know if you want to design web pages without tables.
The <div> and <span> elements are meaningless tags. What do I mean by that? Well, unlike other tags, such as “p” or “h1”, they have no inherent properties associated with them. Any properties they have must be assigned to them by the developer, generally with the “class” and “id” attributes. Let’s start out by taking a closer look at the <div> tag.
The <div> tag
The <div> tag is a block level element. That means it will cause a line break, similar to a “p” or a “h1”. Think of it as a customizable holding box for other elements. When placed inside of this box, other elements will take on its attributes. <div> tags have two important functions:
- They are used to group sections of a page together and assign certain properties
- They are used in page layout
For example, if I wanted to assign certain properties to the navigation section of a site, I would assign those properties to one DIV tag and place all navigation elements inside of it. Let’s take a look at that concept in action. First, look at the code:
<html>
   <head>
      <title>
         DIV and Span
      </title>
   </head>
   <style type="text/css">
      h1         {
      border: 1px solid black;
      background-color: 006478;
      }
      .nav         {
      font: normal bold 12px/1.5 arial;
      background-color: efefef;
      text-align: center;
      color: white;
      padding: 10px;
      margin: 5px;
      border: 1px solid black;
      width: 200px;
      }
   </style>
   <body>
      <div class="nav">
         <h1>
            Home
         </h1>
         <h1>
            Products
         </h1>
         <h1>
            Services
         </h1>
         <h1>
            About
         </h1>
      </div>
   </body>
</html>
Now, see how this code would look on a browser.
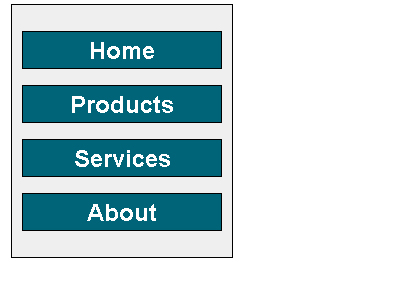
You’ll notice that all the attributes from the <div> tag are inherited by any tag inside of it, unless otherwise defined. For example, if I had not defined the background color of the “h1” tag, it would gray, just like the background.
The <div> tag is also commonly used in page layout. Using CSS, you can position a DIV element and any elements inside of it anywhere you want. Let’s say that you want to make a three column layout. Using tables, this task would take a fair amount of code. Let’s take a look at how easy it is using DIVs. First, look at the code:
<html>
   <head>
      <title>
         Three column layout
      </title>
      <style type="text/css">
         .top                  {
         width: 810px;
         height: 75px;
         border: 1px solid black;
         margin: 5px;
         background-color: efefef;
         text-align: center;
         font: normal bold 16px/4.5 arial;
         color: red;
         }
         .middle         {
         width: 265px;
         height: 300px;
         border: 1px solid black;
         background-color: a8a8a8;
         float: left;
         margin-left: 5px;
         font-weight: bold;
         }
      </style>
   </head>
   <body>
      <div class="top">
         Page Title
      </div>
      <div class="middle">
         This is cell 1
      </div>
      <div class="middle">
         This is cell 2
      </div>
      <div class="middle">
         This is cell 3
      </div>
   </body>
</html>
Now, see what the code would look like on a page:
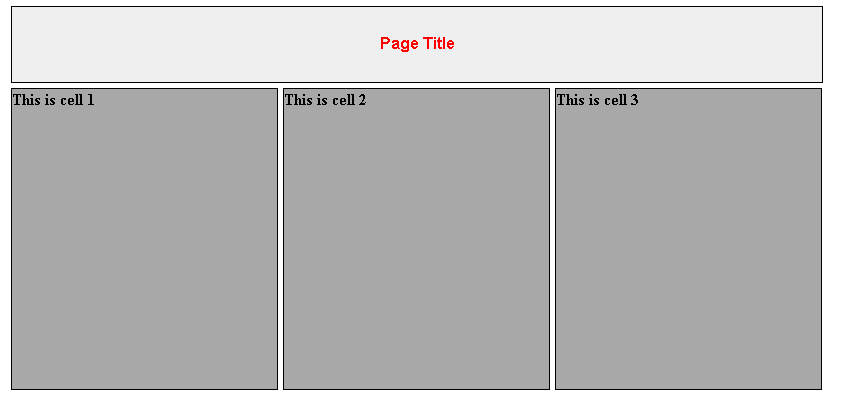
Do you see just how much easier and cleaner that is than tables? Also, each DIV is completely adjustable. Using DIVs for page layout is not only cleaner, it is easier and more versatile as well.
The <span> tag
Like the <div> tag, the <span> tag is used to link style sheet rules to sections of a document. However, the <span> tag is an inline element, meaning it will not cause a page break. Like a <div> tag, a <span> tag will affect everything inside of it. <span> tags are generally used to format text, and will not affect the layout of a page.
For example, let’s say that I want to place more emphasis on certain words throughout my page. I would create a span class, and assign it to whichever words were in need of emphasis, like this:
<html>
   <head>
      <title>
         Span
      </title>
      <style type="text/css">
         span.emphasis         {
         font: italic bold 12px/1 arial;
         color: red;
         background-color: yellow;
         }
      </style>
   </head>
   <body>
      The White Sox are clearly the <span class="emphasis">superior</span> Chicago baseball team, because they have
      <span class="emphasis">Ken Griffey, Jr.</span>.
   </body>
</html>
This code would appear on the screen like this:

Conclusion
Both the <div> tag and the <span> tag have a very important role in CSS and web design. They are used to group and structure a document, and assign properties to specific parts of your page. They are used in close conjunction with the CLASS and ID attributes. The DIV tag is also used in web layout, and can take the place of tables, while the SPAN tag is mainly used with text. Understanding how these two elements work is vital to web design with CSS.