What is Data Explorer?
The m-Power Data Explorer is a web-based reporting feature that allows end-users to create their own reports, charts, and dashboards in an easy-to-use interface.
End-users access their data based on previously created Data Models (created by developers) and have the ability to control numerous aspects of their report including:
- Presentation of the data. Choices include tabular ad-hoc searching and totaling, visualization through graphing, Pivot Tables, and more.
- Ability to export data to Excel
- Control of which columns are selected as well as their order
- Ability to filter data and add calculations
- Options to save custom designs
- Exporting to Dashboards
- And much more…
Learn more about this feature with this short walk-through:
Terms
For added clarification, some terminology that will be frequently appear in the proceeding documentation is described here:
- DX– A short-hand abbreviation for the m-Power ‘Data Explorer’
- Developer – An individual who creates and designs applications and Data Models for end-users.
- End-User – In direct contrast to a developer, an end-user does not build any applications or Data Models but simply runs and accesses the applications and models a developer has made for them.
- Interface – The m-Power Development UI where developers are creating applications and models.
- Runtime – The environment where end-users access finished applications and models. End-users do not have access to the m-Power Interface.
m-Power Data Explorer (DX) – Main Menu
The main menu for Data Explorer will look like the following image:
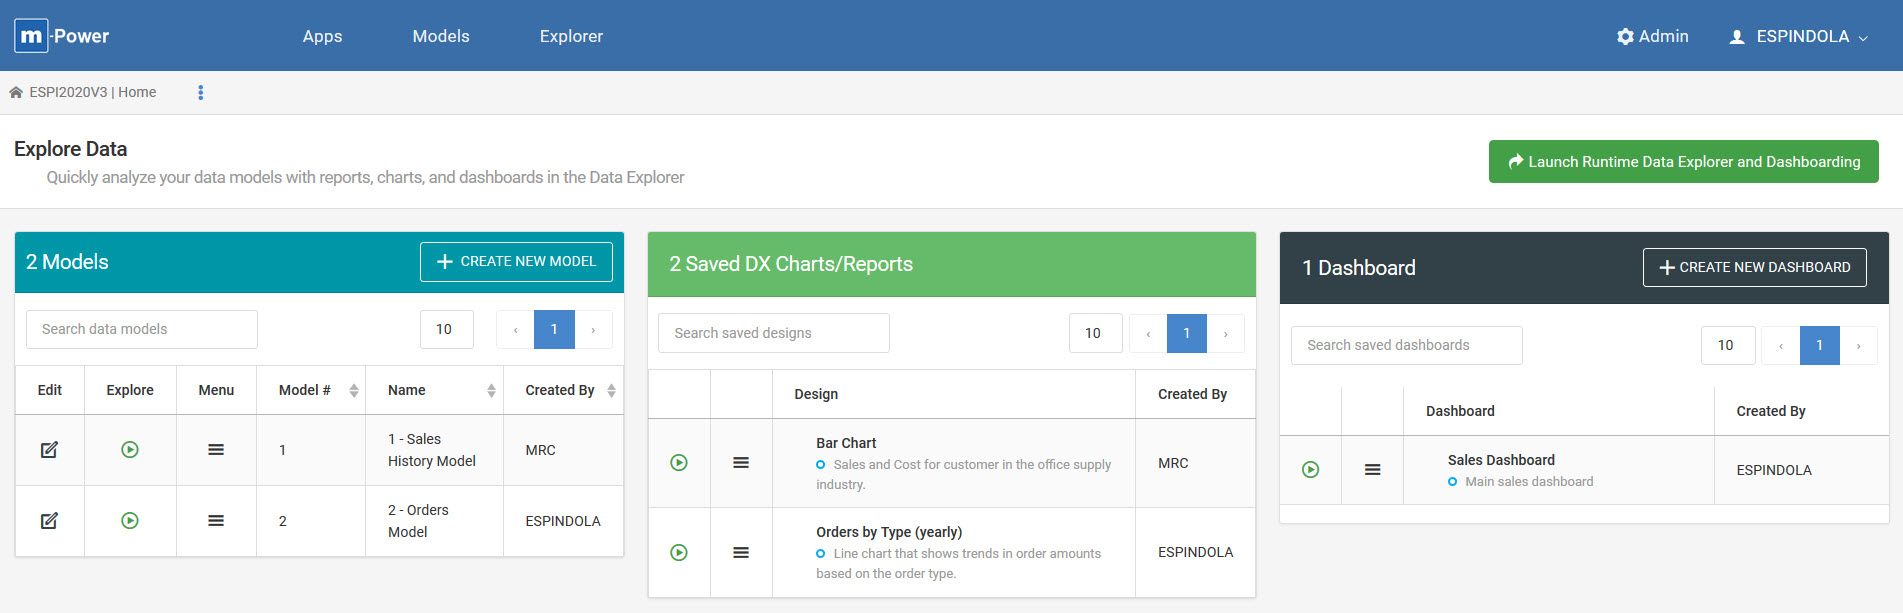 Fig 1. Data Explorer Main Menu – Developer view
The Data Explorer menu will have three separate panels displaying Data Models, Saved DX Charts/Reports, and Dashboards. Each section will be outlined in greater detail.
Before continuing, it is worthwhile to mention on the main menu screen the ‘Launch Runtime Data Explorer and Dashboarding’ option (shown in Figure 1). Data Explorer is accessible to all developers who have login access to the m-Power interface. However for end-users who do not have a developer login to the m-Power interface, this option will load Data Explorer menu in a separate runtime environment, as shown in the following image:
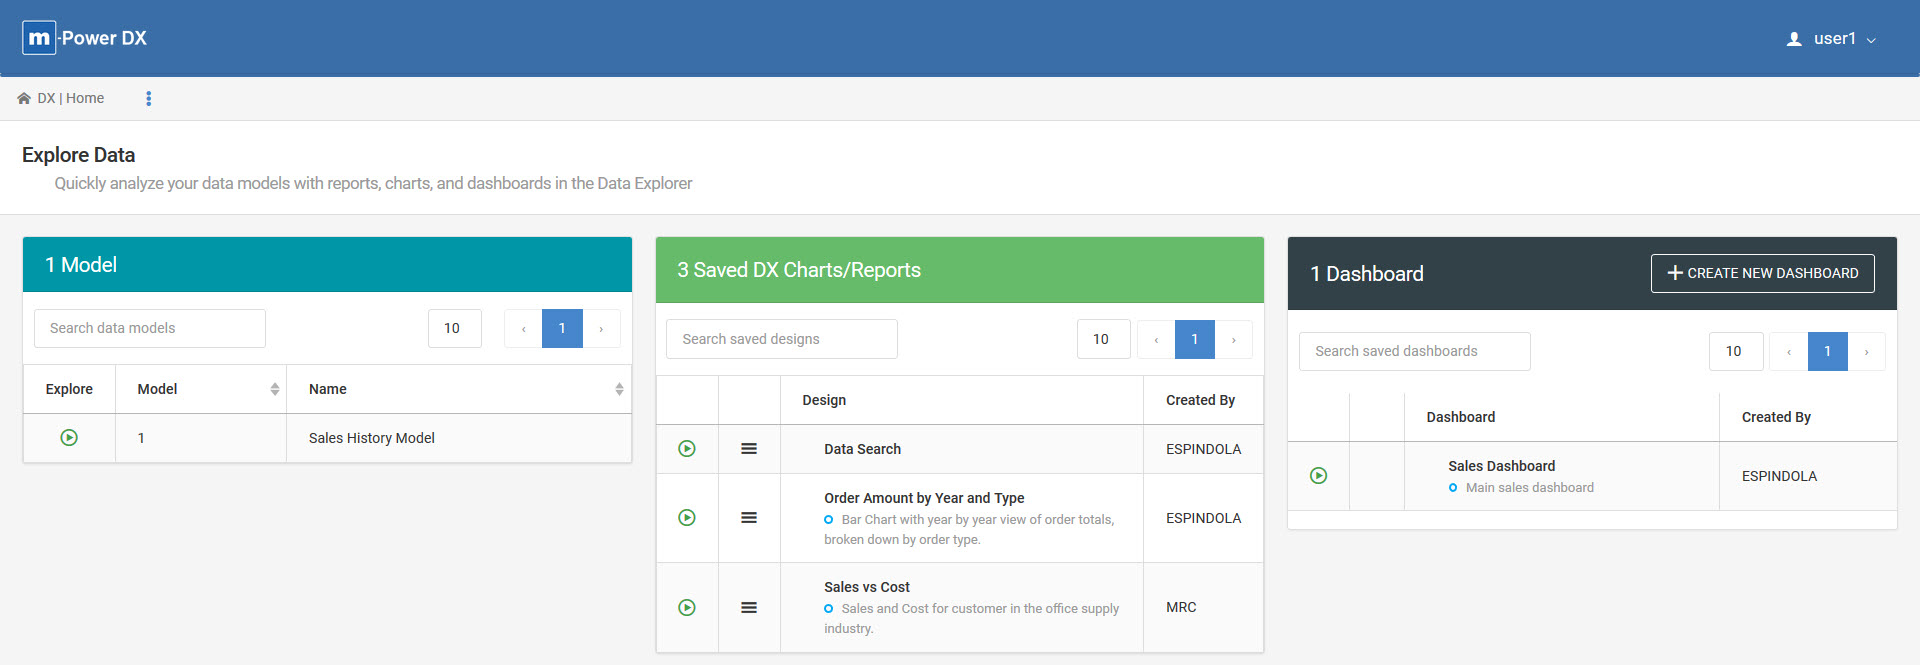 Fig 2. Data Explorer Main Menu – End-User view
Notably in this separate runtime Data Explorer menu, an end-user is contained to Data Explorer and cannot access any features of the developer interface. This includes editing m-Power applications, Data Models, and accessing Admin features. Giving end-users access to this runtime Data Explorer environment, specifically to explore and create designs from Data Models, will require a license file from mrc. Please contact support@mrc-productivity.com for more information.
Note: m-Power’s dashboard functionality, explained further in this documention does not require any additional license file to use dashboards in a runtime envirnonment.
Models
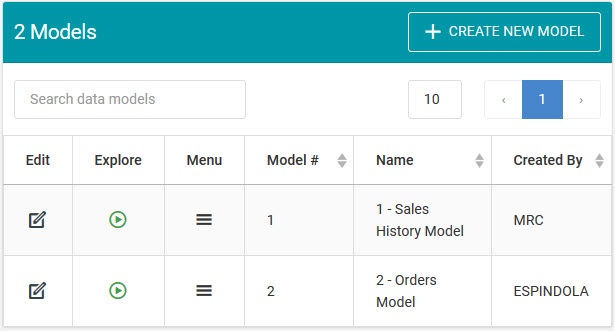
Fig 3. Data Models Panel
Data Models are an essential building block for the m-Power Data Explorer that the end-user utilize to create reports and charts in DX. Data Models are not made by end-users, but rather created by developers who define in each Data Model the data, fields, and calculations that they want avaliable for their end-users. Hard-coded filters and other m-Power features like Row Level security can also be easily implemented by a developer into a model. Once a Data Model is created, the developer can utilize m-Power’s role-based menuing system to assign models to individual end-users for exploration.
This documentation will focus on exploring and customizing a design from Data Models, rather than creating the Data Model itself. For more on creating Data Models for DX, please see here.
Exploring Data Models
Pressing the ‘Explore’ button on any Data Model will begin the process of creating a design and present a window like the following image:
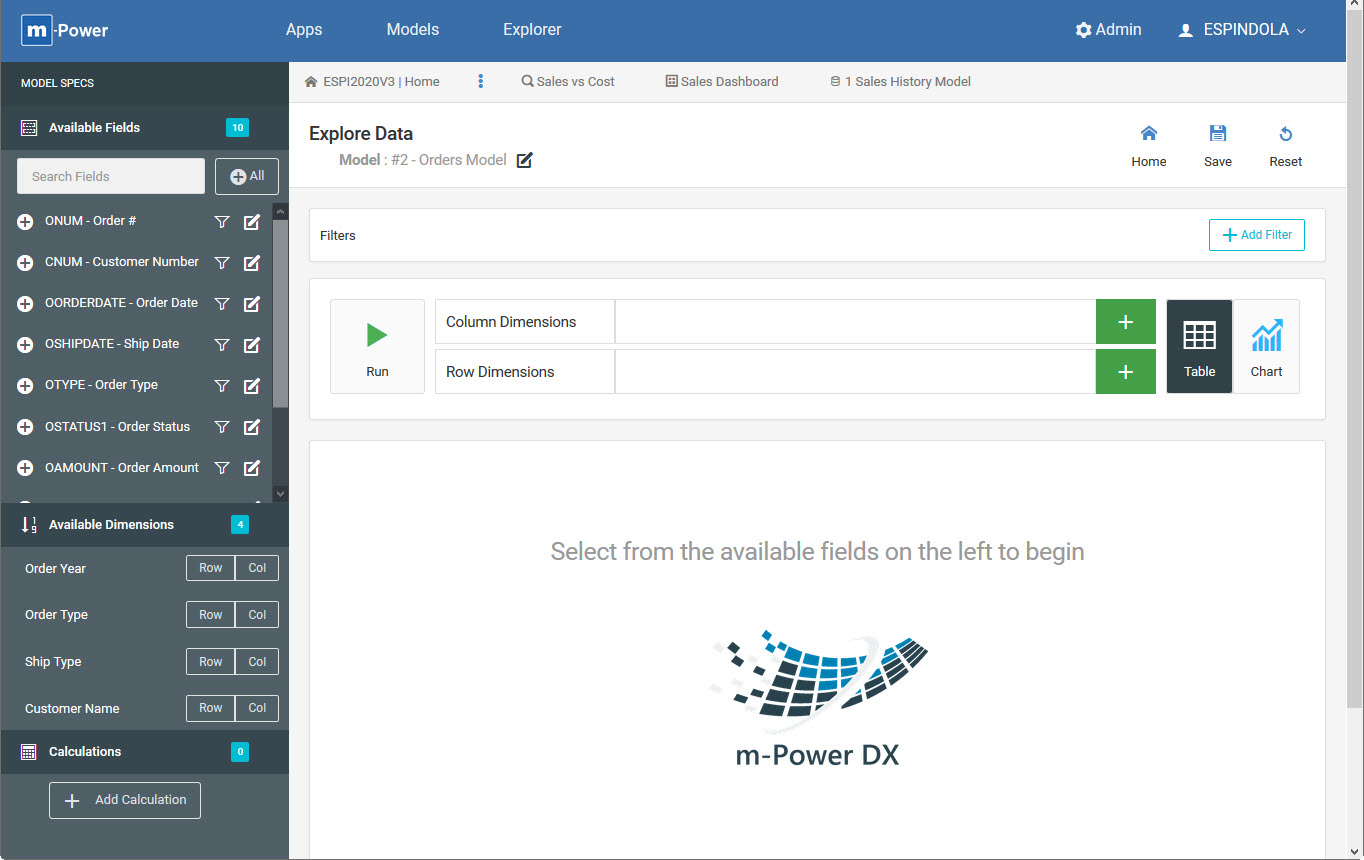
Fig 4. Exploring a model in Data Explorer
Fields
Before any output is shown, the first step is to select fields from the left-side panel under ‘Available Fields’. Clicking the row will add that field to the current design, indicated by the check-mark. After selecting it, you can further customize the field by changing its description, hiding it from the output, or changing the display format (numeric fields only) by clicking the “Edit” (pencil) button. As fields are selected, they will also appear as columns in the output section of the screen.
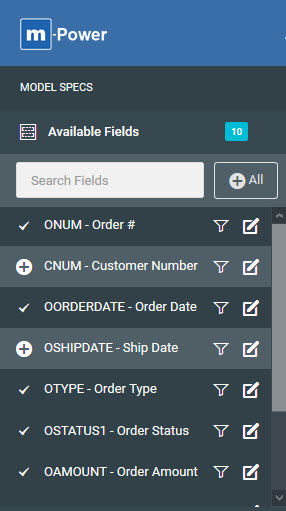
Fig 5. Selecting fields
Dimensions
Dimensions are optional. Most importantly they are used to specify how a dataset should subtotal results if the design will be a data table, and also function to specify Chart Groups if the design will be chart. Selecting ‘Row’ for a field will create a subtotal in the dataset using that field. Using the ‘Col’ (column) option is only applicable when creating a Pivot Table design and must be used with at least one other Row dimension. The selected ‘Row’ and Col’ (column) dimensions will define the Pivot table’s rows and columns, respectively.

Fig 6. Dimensions
Note that while accessible in the left panel (as shown in Figure 6), the row and column dimensions are also reflected and configurable right above the data output (Figure 7). The user may remove dimensions, or press the green plus button to add more to the current design.

Fig 7. Dimensions
The sequence of the selected dimensions can also be reordered via drag and drop functionality. When multiple dimensions are selected, the sequence they are ordered in needs to be taken into considered by the user. Taking Figure 7 as an example, the data table will subtotal by Order Year, and then within each year by Order Type (EDI, FAX, WEB, etc.).
Calculations
Calculations allow the user to create equations at runtime. To do so, select ‘Add Calculation’. Then add a description for the calculation, as this will serve as the column heading. To enter the expression, select a column from the dropdown list. Only columns you’ve selected within this design will be available.
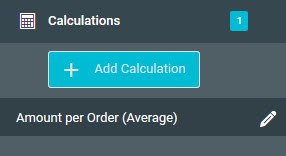
Fig 8. Calculations
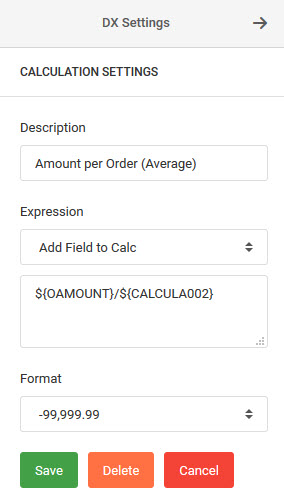
Fig 9. Creating a calculation
Filters
Users have the built-in ability to create their own custom filters for the data set. Press the ‘Add Filter’ button in the center of the design window to open the Filter Settings slide out menu on the right-hand side of the screen. All columns are available for filtering, even those that are not selected for the current design. Be sure to select a “Relationship” when adding a new Filter. Other options when making a filter include comparing a filter to static value, or against another field in the design.
The current filter criteria will always be displayed at top of the design output, easily visible to the user and editable via the pencil icon.
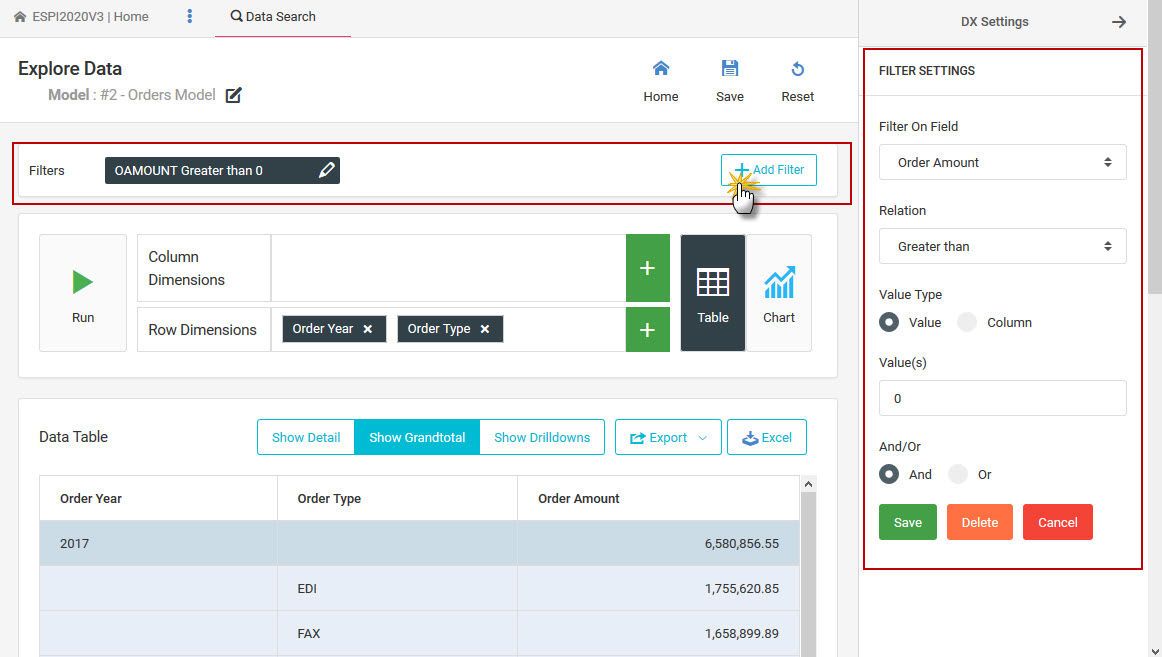
Fig 10. Creating filters
Note: Use the ‘Reset’ option when creating a design to clear all selected fields, calculations, filters, and dimensions from the current design.
Output – Report Tables and Charts
DX users have the ability to configure and display their design either with a report table or a chart to solve their reporting needs.
Report Tables
The report table output offers built-in ad-hoc searching (through Filters), column sort functionality, column reordering, and Excel output. Clicking on a column heading will resort the data, and holding down on a column heading will allow drag and drop functionality of the on-screen column order.
Beyond these common features, the report table is further configurable to meet specific reporting needs. The following list breaks down how the data table may be configured for the user:
- Data Table – Activated when no dimensions are selected in the current design. Shows information 10 rows at a time (customizable) and uses a pagnation feature to page through the data set. Ideal for finding individual data and offers optimal performance when working with large data sets is required.
- Data Table with Totals – Activated when at least one or more row dimensions are selected for the current design. Great for calculating sub-total and grand total information. Use the Dimensions tab to control how you would like your data sub-totaled.
- Pivot Table – Activated when at least one or more row dimensions AND one or more column dimensions are selected for the current design. The Pivot Table functionality allows the user to configure the row(s) and column(s) that make up the table structure, and offers row and column subtotaling/grandtotaling.
- Drilldown Table – Activated when at least two or more row dimensions are selected for the current design and in addition to selecting the ‘Show Drilldowns’ option above the table. Useful when wanting to compress data at a high level, and give the user the ability to drill into deeper levels of data.
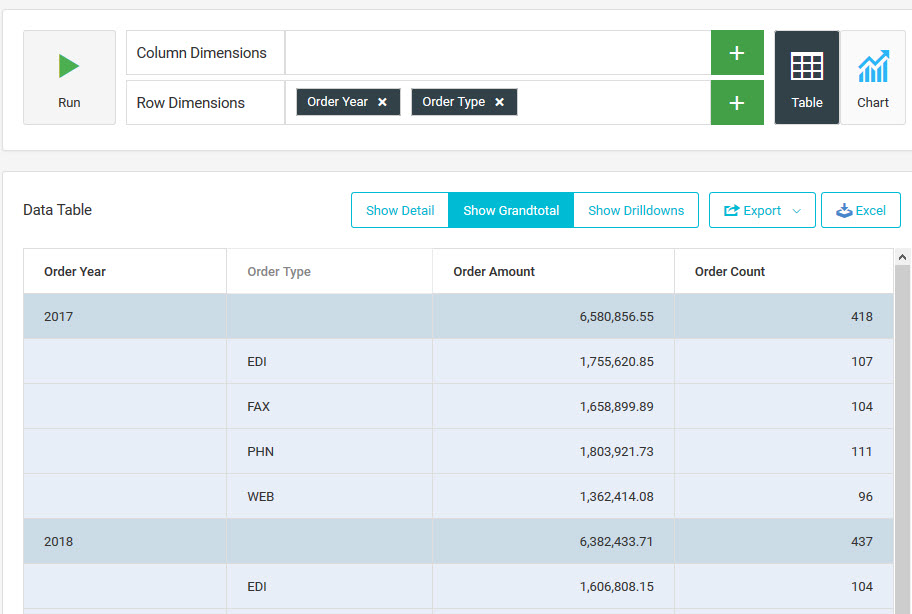
Fig 11. Data Table with Totals example
With all report table options, the level of detail desired in the report and the ability to export the data are presented directly above the table (Note that ‘Show Drilldowns’ is only used to generate the Drilldown Table). Pressing ‘Export’ will allow you to add your current design to an m-Power dashboard, whereas the ‘Excel’ option will output the current data displayed in the design to an Excel file.

Fig 12. Detail options and exporting
Charts
The charting functionality in DX offers robust data visualization. Charts are perfect candidates when at-a-glance views of key performance indicators are desired, and work in tandem with m-Power Dashboards.
As shown in Figure 13, once the output has been specified as a chart, any currently selected Row Dimensions will function as Chart Groups. Additionally, the user will need to specify at least one Chart Fields (using the green plus button) to indicate which field(s) values will be plotted in the graph:
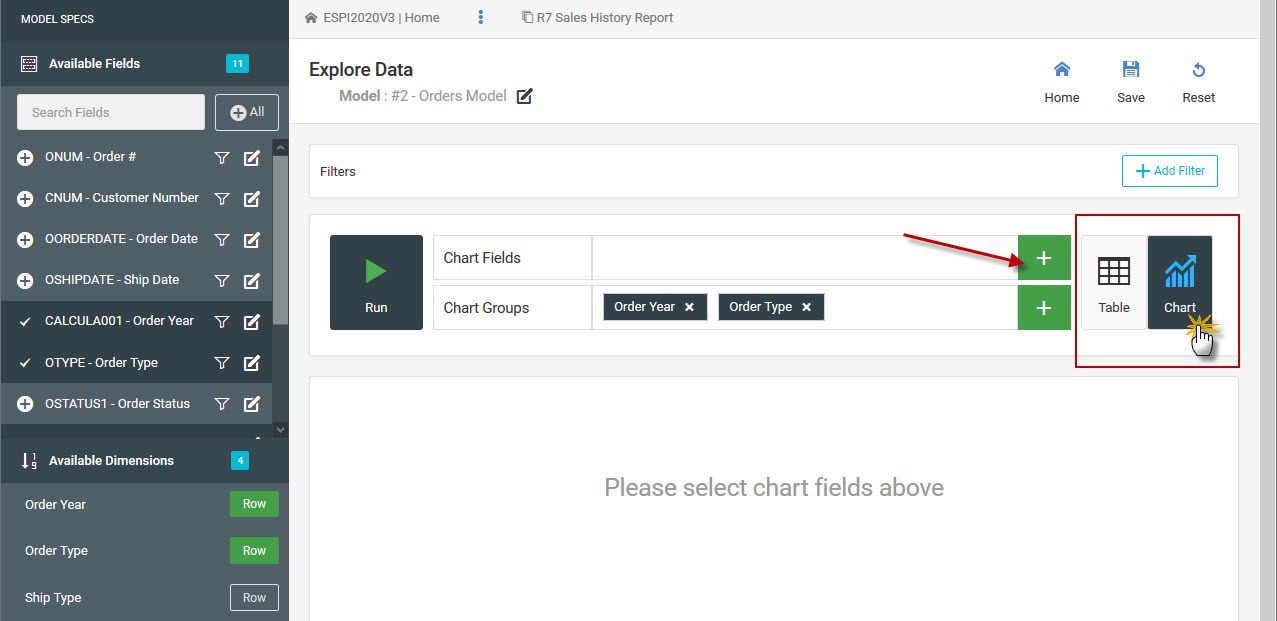
Fig 13. Configuring a chart
When changes are made, make sure to press ‘Run’ to update the design output.
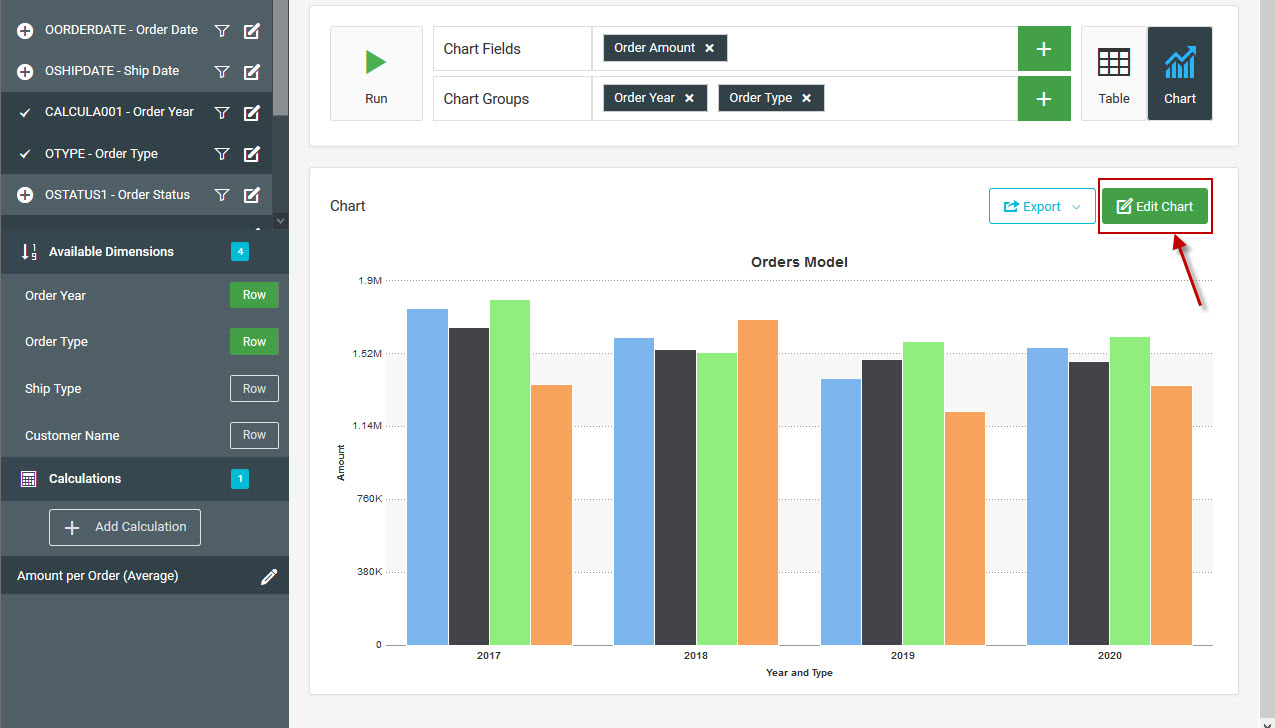
Fig 14. Column Bar chart showing order amounts totals by year and type
Charts may be individually customized using the ‘Edit Chart’ button (Figure 14). Various customization options among others include configuring the chart type (bar chart, pie, scatter plot, and more), creating axis labels, choosing the chart theme, and enabling a chart legend.
Saved DX Charts/Reports
Once a Data Model has been explored and design has been created from it, the design output can be saved to easily revisit later. Saved DX Charts/Reports can by created ahead of time by the developer for end-users, or an end-users themselves can explore a Data Model to make and customize their own saved designs. Furthermore, Saved Designs (both report tables and charts) made in DX may also be directly added to an existing m-Power dashboard.
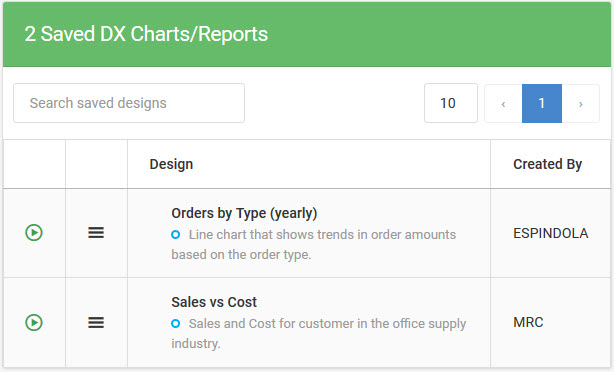
Fig 15. Saved DX Charts/Reports Panel
Creating a Saved a Design
While exploring a Data Model, press ‘Save’ in the top corner of the screen to save the current design.
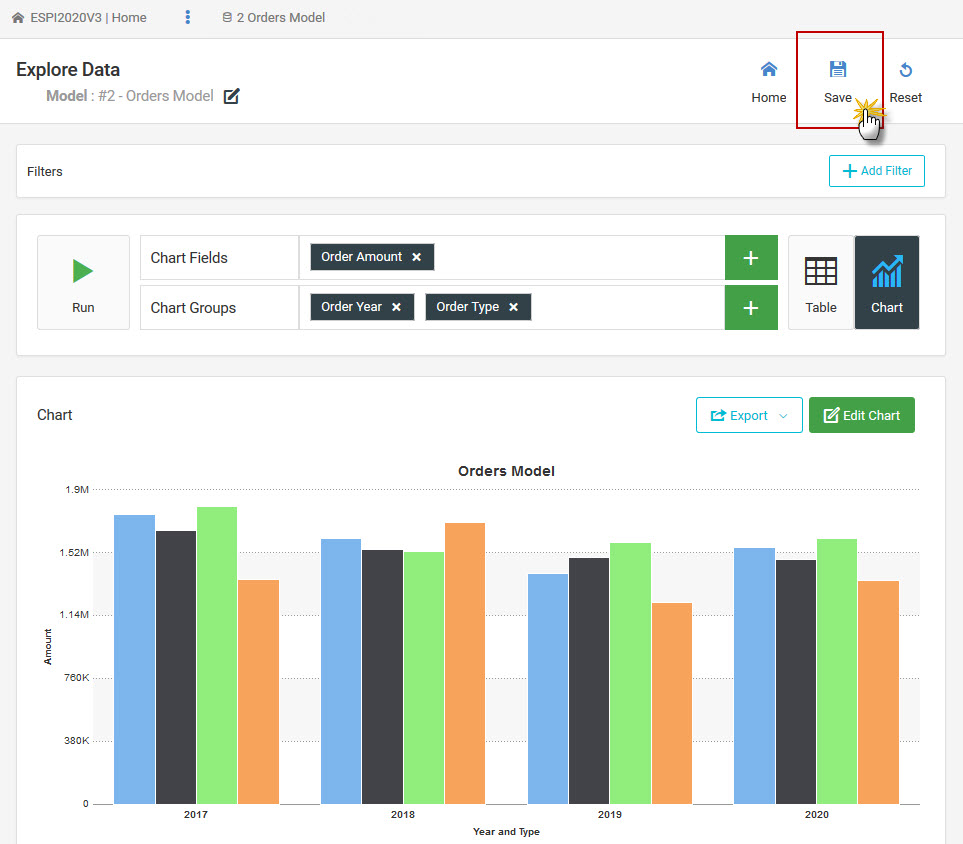
Fig 16. Save option
Provide a name, and an appropriate description for the design. Marking a design as ‘Public’ will allow other DX users to view and edit this saved design. Otherwise if unmarked, this saved design will be private, and not accessible or visible to any user except the one who created it.
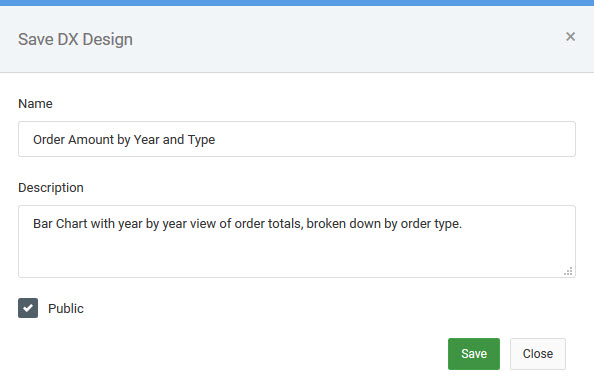
Fig 17. Saving a Design
Exporting a Saved Design (to Dashboard)
Before any data table or chart design can be added to a dashboard, it must be saved as a Saved Design. While exploring a Saved Design, select ‘Export’ –> ‘Add Design to Dashboard’. A new dashboard may be created, or an existing one can be selected to add the design to. See more on Dashboards in the proceeding section.
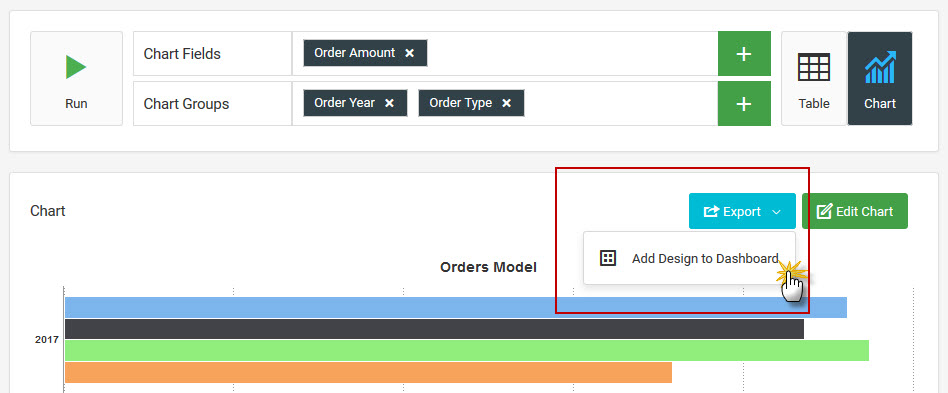
Fig 18. Exporting a saved design to a dashboard
Dashboards
The dashboarding utility in m-Power is accessible right from m-Power’s Data Explorer main menu. Dashboards can be configured by the developer ahead of time and allow any m-Power Applications (Retrievals and Reports) and/or DX Reports/Graphs to be added directly to the dashboard. Alternatively a dashboard can be created by an end-user, however they will only be able to add their saved designs from Data Explorer to the dashboard. For more information on dashboards, see here.
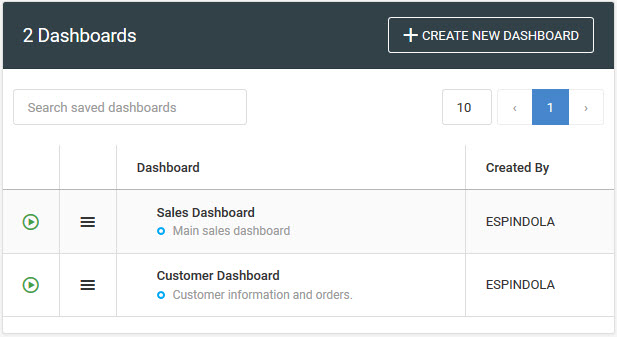
Fig 19. Dashboard Panel
Promoting to Production
When promoting Models, Saved Designs, and Dashboards to production the following lists out the necessary files required to be promoted:
Note: Replace any references of ‘DD’ with your corresponding Data Dictionary name. Replace any references of ‘DXXXXX’ with your Data Model number. If your Data Model is #10, the corresponding files will be D00010s.json and D00010p.xml.
Data Models
| File | Location | Description |
|---|---|---|
| saved-data-models-vue.json | /m-power/mrcjava/WEB-INF/classes/DD | List of all Data Models within the data dictionary |
| DXXXXXs.json | /m-power/mrcjava/WEB-INF/classes/DD | Data Model specifications |
| DXXXXXp.xml | /m-power/mrcjava/WEB-INF/classes/DD | Data Model properties |
Saved DX Charts/Reports
| File | Location | Description |
|---|---|---|
| DDdxsaveddesigns-vue.json | /m-power/mrcjava/mrcdb | List of all Saved Designs within the data dictionary |
| DXXXXXs.json | /m-power/mrcjava/WEB-INF/classes/DD | Data Model specifications |
| DXXXXXp.xml | /m-power/mrcjava/WEB-INF/classes/DD | Data Model properties |
Dashboards
| File | Location | Description |
|---|---|---|
| DDdxdashboard-vue.json | /m-power/mrcjava/mrcdb | List of all Dashboards within the data dictionary |
Note: Any m-Power applications or Saved DX Designs utilized in the dashboard must also be promoted to production.
Important Notes
- As noted earlier in this documentation, utilizing Data Models and Saved Designs from those models in a runtime (production) environment requires an additional license file from mrc. m-Power’s dashboard functionality does not require any additional license file to use dashboards in a runtime environment. Please contact support@mrc-productivity.com for more information.