

Overview
Two-factor authentication provides an additional security layer for user authentication. When a user authenticates via their username and password, a secondary form of authentication is prompted where the user must enter a unique code sent via email, text message, or a TOTP (Time-based One-Time Password) authenticator app.
This document will discuss steps on how to set up two-factor authentication in m-Power.
Implementation
Step 1 – Editing your Security Settings
In the m-Power developer interface, navigate to Admin -> Menu & Security -> Edit Security Settings. In the Security Settings window that appears, use the Property Options -> Text Mode to open this file (the mrcSignon2.xml) in a text editor. This file will need the following code added to the bottom, inserted right before the final </mrc_signon> tag:
<two_step_auth>
  <twoFactorAuthentication pdesc="twoFactorAuthentication" value="true"/>
  <sendTextEmail pdesc="sendTextEmail" value="user-choice"/>
  <emailSubject pagetype="template">2FA Test from m-Power</emailSubject>
  <emailBody pagetype="template">Here is your verification code: ${CODE}</emailBody>
  <smsTextBody pagetype="template">Here is your verification code: ${CODE}</smsTextBody>
  <expireInDays pdesc="expireInDays" value="31"/>
  <user_info_table tablename="DICTIONARY.MRCSEC1" col_user="USERID" col_email="USEREMAIL" col_phone="USERPHONE" col_totpsecret="TOTPSECRET"/>
  <totpIssuer value="m-Power"/>
</two_step_auth>
Once this block of code has been added, save the editor and re-open the Edit Security Settings window. The Two Factor Authentication section should now be presented:
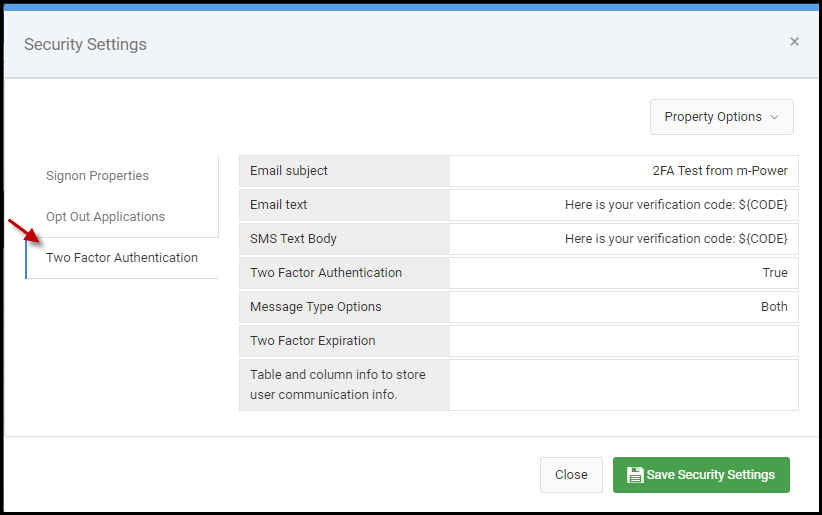
2FA Properties
All 2FA properties shown in the above figure are explained in detail below:
Email Subject: The subject text of the email that will be sent to the user containing the verification code. Only applicable when the Message Type Option is either “Email” or “Both”.
Email Text/SMS Text Body: This is the display text the user will be shown via SMS text and email, respectively. Each message may be modified to your liking.
The variable ${CODE} represents the authentication code that will supplied to the user. If you do not put it in there, it will append the code to the end of the body.
Two Factor Authentication: Enables or disables the user of 2FA within the current data dictionary.
Message Type Options: Use to select the verification options presented to the user. Choices are
- SMS
- Both (SMS and Email)
- TOTP (Time-based One-Time Password)
Selecting both will allow the user to choose at runtime between SMS and Email for their verification code.
Two Factor Expiration: Use this option to specify the number of days before the 2FA cookie (set in the browser) will expire for the user and thus will require the user to re-authenticate via 2FA again.
For example, when a user signs in and authenticates against 2FA for the first time, here are some applicable options for this setting:
- A value of 30 means 30 days from the initial sign on before the user’s next sign on attempt will require 2FA again. This number can be adjusted as desired.
- A value 0 means no expiration date after the end-user’s initial 2FA. The user will never be presented with 2FA again, unless they attempt to access the application from a new device or new browser.
- A value of -1 means 2FA will be prompted to the end-user on every sign on attempt.
Table and Column info: The table and columns that contain the user information, which m-Power will use for sending the user an email or SMS text message, must be specified here.
Step 2 – Setting up the 2FA screen
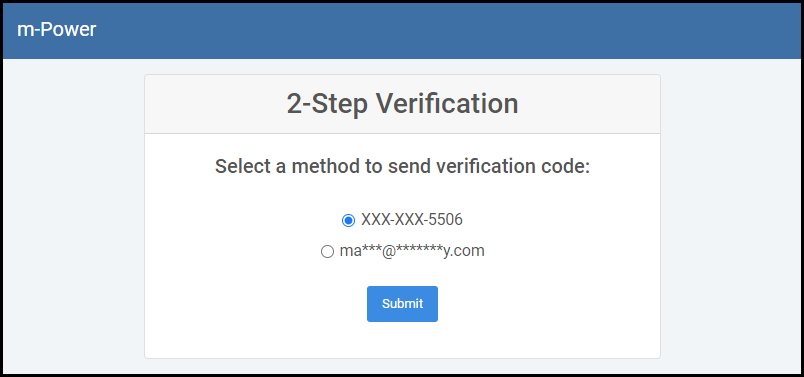
The screen presented to the end-user during the 2FA process depends on your chosen message type.
For Email and SMS Verification:
The default screen is the mrcAuthentication.html file located in your dictionary folder (.../m-power/mrcjava/WEB-INF/classes/DICTIONARY). If this file is not within this directory, simply copy it from .../m-power/mrcjava/mrcclasses/. You may customize the style of this page to your liking.
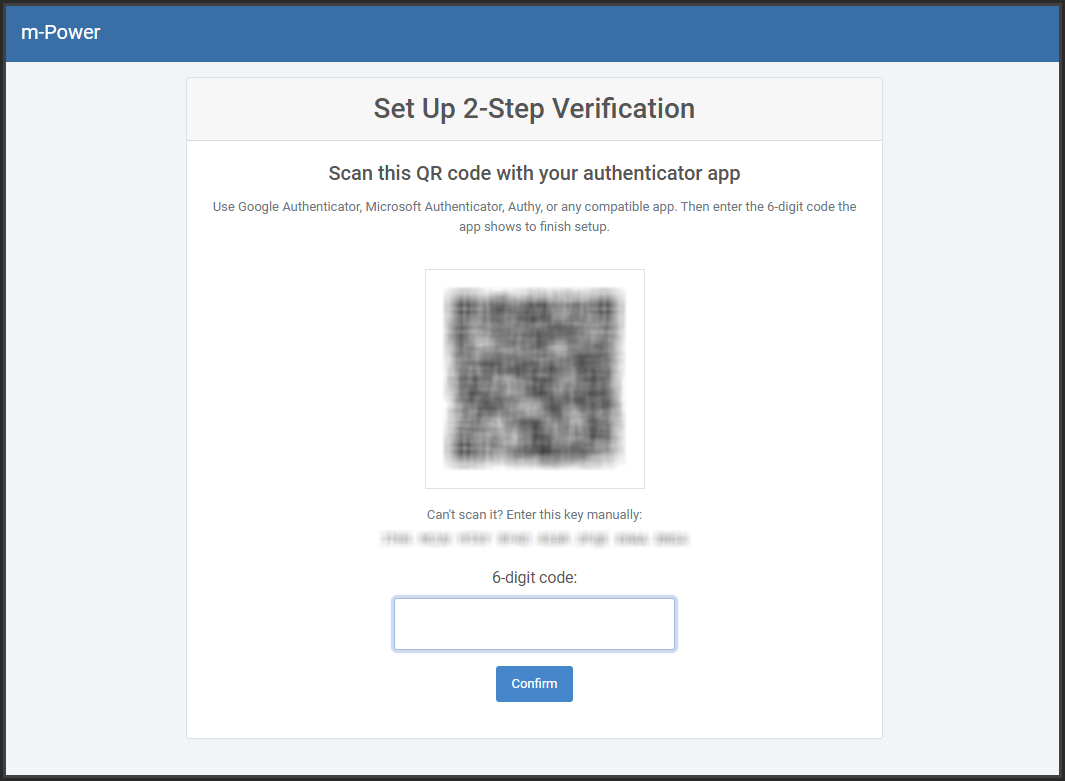
For TOTP Verification: m-Power utilizes two separate HTML files specifically for authenticator-app workflows:
mrcAuthenticationTotpSetup.html: Prompted on an unenrolled user’s first login to display the QR enrollment code. Default versions are bundled inside m-Power and are used automatically when a dictionary has no local copy. To customize them, copy the master files from /mrcjava/mrcclasses/ into your dictionary folder.
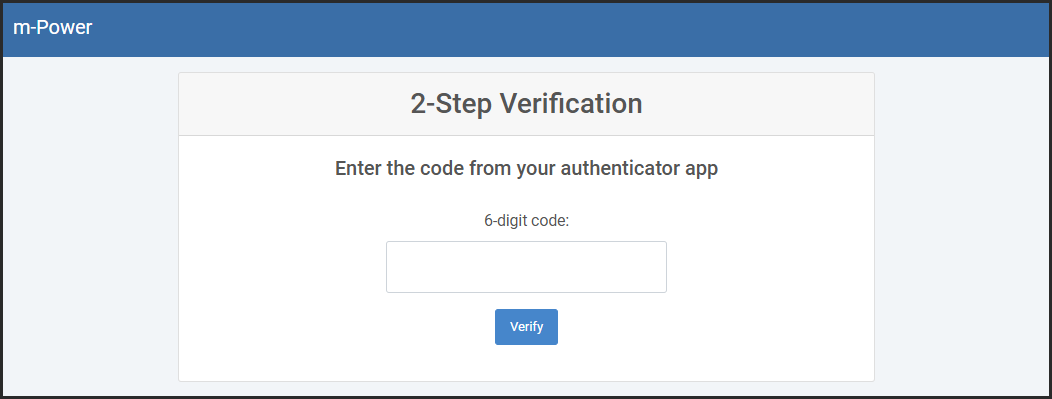
mrcAuthenticationTotp.html: Prompted when an enrolled user needs to enter their 6-digit code.
Step 3 – Add entry to web.xml file
Open the web.xml file, located in …/m-power/mrcjava/WEB-INF in a text editor and do a search for “mrc_auth2”.
The following servlet shown below must be listed in this file. If is it not listed, please copy the code and place this at the bottom of the file before the final </webapp> tag at the very bottom of the file.
<servlet>
  <servlet-name>mrc_auth2</servlet-name>
  <servlet-class>mrc.TwoFactorAuthentication</servlet-class>
</servlet>
<servlet-mapping>
  <servlet-name>mrc_auth2</servlet-name>
  <url-pattern>/servlet/mrc.auth2</url-pattern>
</servlet-mapping>
Once the file has been saved, Tomcat will need to be restarted at this point.
TOTP Configuration
If you selected totp for your Message Type Option, additional database and server configurations are required.
Database Changes
One new column is needed on your user info table to store the user’s TOTP secret. By default, this column should be named TOTPSECRET.
- The column stores the secret as plain Base32 when no encryption key is configured.
- When the
totp_encryption_keyproperty is set, the secret is stored asenc:<base64>. - An empty or NULL value in this column means the user is “not enrolled yet,” prompting the QR enrollment page upon their next login.
Example DDL per platform (adjust schema/library as needed):
-- IBM i / DB2:
ALTER TABLE MYLIB.MRCSEC1 ADD COLUMN TOTPSECRET VARCHAR(200) DEFAULT NULL;

-- SQL Server:
ALTER TABLE MYLIB.dbo.MRCSEC1 ADD TOTPSECRET VARCHAR(200) NULL;

-- Oracle:
ALTER TABLE MYLIB.MRCSEC1 ADD TOTPSECRET VARCHAR2(200);

-- MySQL / MariaDB:
ALTER TABLE MYLIB.MRCSEC1 ADD COLUMN TOTPSECRET VARCHAR(200) NULL;

-- PostgreSQL:
ALTER TABLE mylib.mrcsec1 ADD COLUMN totpsecret VARCHAR(200);
A TOTPSECRET value that is empty/NULL means “not enrolled yet” — the user gets the QR enrollment page on next login.
Re-enrollment / lost phone
If a user needs to be re-enrolled (for example, they lose their mobile device or get a new one), the TOTPSECRET value must be nullified.
UPDATE MYLIB.MRCSEC1 SET TOTPSECRET = NULL WHERE USERID = 'JSMITH';Once the field value is reset, the user re-enrolls with a fresh secret on next login.
mrc-runtime.properties
Optional advanced properties can be configured in /mrcjava/WEB-INF/classes/mrc-runtime.properties:
totp_encryption_key: Recommended for live production environments. This property scrambles the secret codes (using AES-256-GCM) before saving them to your database. This ensures that even if someone gained unauthorized access to your database, they could not read the secrets or generate valid login codes. Without this key, the secrets are stored as readable plain text.
Example configuration: totp_encryption_key=0nyqUmzvM+UtNOgil8AZMrhcAgs8H3NzeEhtxgjh21Y=
totp_window: Adjusts for slight time differences between your server and a user’s phone, which is often called “clock-drift tolerance”. Because authenticator apps generate codes based on the exact current time, a legitimate code might fail if a user’s phone clock is slightly fast or slow. This setting provides a brief grace period by accepting codes from just before or just after the current time. It accepts values from 0 to 4. The default value of 1 means a code is valid for roughly 30 seconds before and after the current time.
totp_issuer: The default company or app name displayed inside the user’s authenticator app. This is the label shown right above the 6-digit code on their phone, helping them identify what the code is for. Setting a value here is global, but can be overridden per dictionary in your mrcSignon2.xml file
HTML Customizations
Default versions are already included with m-Power and are used automatically when a dictionary has no copy. To customize for a dictionary, copy the master files (mrcAuthenticationTotp.html and mrcAuthenticationTotpSetup.html) from /mrcjava/mrcclasses/ into /mrcjava/WEB-INF/classes/[DICTIONARY]. Replace [DICTIONARY] with your actual dictionary name.