The Business Rules Designer allows developers to create their own custom business processes, directly in m-Power, without any coding. These business rules can be invoked on a per row basis (such as returning a result for every record in a report), per action (such as calling logic when a user submits a record via a maintenance application), or on a schedule (for example, calling a process to run every morning at 4am). Some common uses of Business rules may include:
- Validity Logic — A developer may want to ensure a date entered is in between a custom date range. Adding this logic via a business rule ensures users must follow validity logic. If not, the user will be shown an error message, and must correct the error before proceeding.
- Conditionally Calling Task Groups — A developer wants to send an email, but only if a user marks a certain value on their maintenance form input. Business rules allow task groups to be conditionally executed based on any available input parameters.
- Workflow Automation — Developers want to build a system to automatically send out past-due notifications after a given time frame.
- Calculating Discounts — For instance, an application that gives some customers discounts based on a variety of factors (how long they have been a customer, volume of sales, proximity, etc…), the app can use a business rule to calculate the discount. This information would be stored and processed globally, so in the event the process needs to be modified, it would only have to be changed in one place.
- User Access Management — When a new employee is added to your organization, do their user account need to be setup in multiple places? How about when the employee is terminated? A business rule could be created that would allow an end-user to setup the user once, then the business rule could automate all the other processes to setup/remove the necessary access.
How to build an m-Power Business Rule
Creating an m-Power Business Rule
- Click Admin Menu from the left navigation panel
- Click the “Custom Code” button
- Click the “Business Rules Designer” button
- Click “Create New Business Rule”
- Name the business rule process and give an applicable description.

Developers will now have the option to add components to their business rule. In general, business rules take in data (either in the form of parameters or via retrievals), run business logic (usually via calling subsequent applications or utilizing conditional logic), then perform an action (either calling a task group, writing data via a maintenance application, or returning any number of parameter(s)).
The choice of what components the developer chooses is entirely up to them, depending on the needs of their overall business rule. Each of the component types will be explained below.
- Parameters — Parameters are described as In/Out. Meaning they both can read to and return values back to their calling program. Available parameter types are Numeric, Character, Date, and Maintainer action mode. Maintainer action mode value is often used when needing to conditionally perform an action on whether the user has added, updated, or deleted a record.
- Steps — Steps are the workhorse of business rules. These steps control what each business rule does and includes: Lookup Data Via Retrieval App, Write Data via Maintenance App, Call a Task Group, and Set Parameter Value
Steps
- Conditional Logic — Prior to listing each step type, this documentation must address the ability to Conditionally call steps, as all steps support conditional logic. To do so, simply select “Yes” on the “Use Conditional Logic” option. Here users can compare Parameter values or Fields referenced in previous steps to hard coded values or other parameters/fields from previous steps. In addition, if your business rule has a date that is a parameter or available field, it can be compared to a date object. To do so, click the gear, select “Compare to a Date”, then use the dropdown options to build the date logic.
Note: Retrievals that are called within Conditional logic cannot be referenced outside of their condition block.
- Lookup Data Via Retrieval App
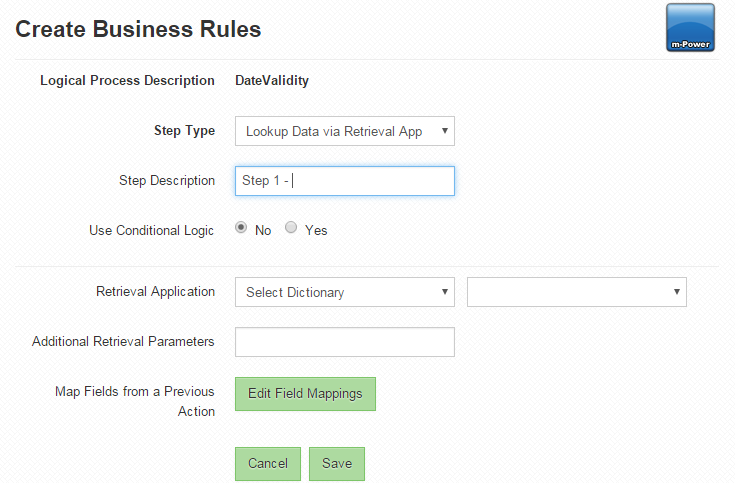
This feature allows the business rule to load data from a pre-existing retrieval. Developers may select a retrieval from within any Data Dictionary to which they have access.
Select “Use Conditional Logic” to only load data from this retrieval based on any conditional logic added.
Use “Additional Retrieval Parameters” to include extra parameters. If multiple parameters are needed, please separate them with an “&” symbol. Note: No “?” is needed at the begging of this input.
Use Edit Field Mappings to pass a parameter or value from a previous step to this retrieval. As an example, this would be useful if the customer number was brought in as a parameter. A second retrieval was then used to pull in all order information that this customer placed. A developer would pass in the Customer # Inbound Parameter and map it to the Customer # Current Step Field.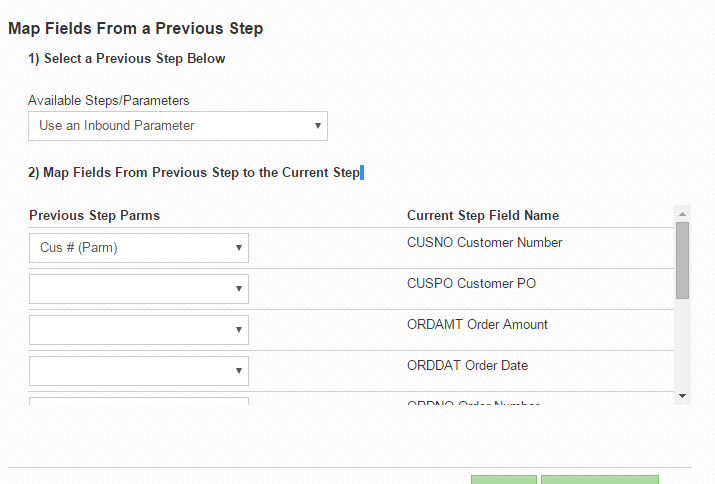
- Write Data via Maintenance App — This step lets the business rule write data back to the database, via maintenance application. Developers have the ability to write data that either has been passed in via parameters or has been loaded in through “Lookup Data Via Retrieval.” When setting up this step, select the maintenance application, and specify the action mode used (Add, Update, or Delete). Be sure to use the “Edit Field Mappings” to control what parameters are being passed to the Maintenance application.
Note: In the event of accessing data from multiple Lookup Data Retrievals, one can only write data to a maintenance application from one retrieval at a time. For instance, consider a scenario where a developer has one retrieval that accessed customer information, and a second retrieval that accessed orders for that customer. When it comes time to write data to a maintainer, they could only write data from either the customer retrieval or the order retrieval at a time. If they needed to write data from both, they would need to call the maintenance step twice. The first step would be to write the data in add mode, and the second call would be to write the data in update mode. - Call a Task Group — Used to execute a pre-defined task group. This task group can also be called conditionally, using the “Use Conditional Logic” option.
- Set Parameter Value — Used for when it is needed to return value(s) to the parent application (the one that triggered the business rule). This value can be hard-coded via the “Set Parameter Equal to” input. This would often be helpful if a business rule was needed to run a validity check. If the validity check failed, a parameter value would be needed to trigger the necessary validity logic.
Once the business rule has been completed, press the “Compile and Return to Manage Business Rules” button. This will compile the object and return the screen to the “Design Business Rules” page. Here developers can:
- Edit description — This button allows the business rule description to be modified. No other changes can be made via this button.
- Delete business rule — After confirming the business rules deletion, please be sure to remove any references to this business rule in any applications.
- View/edit Java source — While not required, some users enjoy learning about/modifying our Java code. To do so, click this button. After any changes, be sure to click “Save” to recompile the object. Please note, any changes made via the Business Rules Designer will overwrite any custom changes to the object.
- Run a Where used report — Lists applications in this dictionary that utilize the selected business rule. Note, only applications that reference this object will appear. Please review “Scheduled Tasks” to see if any business rules are currently scheduled.
- Edit business rules details — Returns the screen to the Edit Parameters/Steps screen described earlier in this documentation.
Business rules can be executed either in applications, via External Objects, or scheduled, via Scheduled Tasks.
- Application — Business rules can be executed like any standard external object. To add the business rule to this application, navigate to External Objects. Business rules are listed below any External Objects.
- Scheduler — Business rules can also be scheduled. To schedule, navigate to “Admin” -> “Utilities” -> “Messaging & Scheduled Tasks.” From the “Messaging Menu” pull down, select “Scheduled Tasks.” Click “Create New Scheduled Task” and select “Business Rules Process” from the “Scheduled Type” dropdown list. Select the Business Rules Process, select the frequency, save, and reload Tomcat.
- Promoting to Production — Business Rules generate new MrcCustomObject#.java and MrcCustomObject#.class files where # is the sequential order listing of the object on the Business Rules page. These files can be found in the applicable data dictionary folder. When a business rule is attached to an application and that application is promoted to production, the associated Business Rule files will be promoted automatically. Without the files in production, any applications that reference this business rule will fail.
- In the event a business rule doesn’t work as expected, please click the “View Source” button in the Business Rules Designer. Press “Save.” If an error appears, please contact mrc support.