Editor’s Note: If you would like to create your own Bootstrap themed template, please contact mrc support.
An m-Power template is the building block for all applications. Every application that is compiled has its specifications sent through a specific template group that automatically generates your .HTML, .JAVA, and .XML files automatically. Modifying these template groups allow you to control specific aspects of every single application compiled. Most importantly, changes you make at the template mean that every time the application is compiled, those changes are automatically added to your application — every time!
Jump to:
- Deciding to Make a New m-Power Template
- Testing your Template
- Registering Templates to m-Power
- Understanding m-Power Templates
- Creating the Template
- Tips and Suggestions for Success
- Dealing with Run-Time Files
- Creating a Template Image
- Packaging your Template
- Moving to Production
- Publishing your Template
- Other Important Notes
Deciding to Make a New m-Power Template
- The first thing to consider when making your own template is deciding why you are making a new template. Generally, there are two main reasons why you would want to create your own template:
- To reduce the number of common changes you make to every application in m-Power.
- For instance, let’s say that you always want your Graphs to default as line graphs rather than bar graphs. Of course, you can change this in every application via m-Painter, or you can copy the “Report with Graph” template and customize it to better meet your needs.
- Note: mrc strongly recommends copying existing templates as any changes made to mrc shipped templates will be overwritten during the next m-Power Update. Copied templates will not be affected by future updates.
- Create new functionality for your web applications.
- Rather than making minor changes, you are encouraged to swing for the fences! In the examples found on our website, we copied and radically changed our existing Report template. As examples, we created a Heat-Color Report and a 3UP Address Label Template.
- Even if creating brand new functionality, we recommend copying an existing template and using it as a starting point to build your new functionality.
- To reduce the number of common changes you make to every application in m-Power.
- Now that you have an idea for what you would like to build, let’s take a look at where we can find the template files. Template files can be found on your server in the following folder: m-powerproddatatemplates. From here, folders are broken down into application types (Retrievals, Reports, Summaries, and Maintenance).
Testing your Template
- Now that you have an idea of what you would like created, the next step is to create your design in m-Painter. By first making your changes in m-Painter, you are verifying that your design concept will work and give you the desired results.
- For instance, the Heat Table Template that was created was first designed on paper, then implemented through m-Painter. Once the page looked and behaved the way that was desired, the same changes that were made in m-Painter were changed in the template.
- For the Heat Table Template, this consisted of adding a <script> tag to include the necessary jQuery logic. Also, an “id” was added to the main table. This was necessary for the jQuery Heat function to work properly.
- By first making the changes via m-Painter, I knew exactly what changes would need to be made in the template.
Registering Templates to m-Power
-
- Let’s say that you would like to modify the ever popular Report Template. Before we can modify the appropriate template, we first need to find out which individual template files are used for this template. To do this, we need to look at the m-Power interface.
- You may be thinking, “How can I register a template that I have not even made yet?” — Don’t worry, by registering the template first, we will know exactly what to name the template files when we create them in the next few steps!
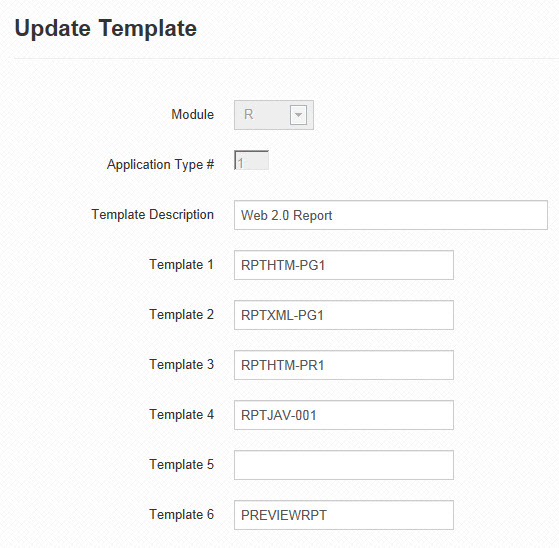
- Go to “Admin Menu”–> “System Management” –> “Template Management”. Search for, in this case, the Report Template. Click Update.
-
-
- Notice that 5 Template files are used in this Template:
- Template 1 — HTML Output + XML Application Properties
- Template 2 — CSV/XML Output (Reports Only)
- Template 3 — HTML Prompt Page
- Template 4 — Java Template
- Template 6 — Preview Template
- Note:
- Template 1 needs to be 10 characters and is required for all templates. However, only templates that have two pages (Reports and Work-with Maintainers) actually use Template 1.
- Template 2 is not required and is only used with Reports. It can be skipped if you are not creating a report template.
- Template 3 is required and serves as the first page accessed by the user.
- Template 4 is your Java Template. It is required for all templates.
- Template 6 is responsible for generating the preview in the Application Menu. It is based on the standard Java file used, in the following format:
- Multiple Record Retrievals, Single Record Retrievals, Option Lists — Java Template: INQJAV-001 — Preview Template: PREVIEWINQ
- Calendar Retrievals — Java Template: INQJAV-CLD — Preview Template: PREVIEWCAL
- Reports, Reports with Graphs, Interactive Reports, and Ranking Reports — Java Template: RPTJAV-001 — Preview Template: PREVIEWRPT
- Pivot Table Reports — Java Template: RPTJAV-PVT — Preview Template: PREVIEWPVT
- Work-with Maintainer, Single Record Maintainer — Java Template: MNTJAV-001 — Preview Template: PREVIEWMNT
- Grid Maintainer — Java Template: MNTJAV-GRD — Preview Template: PREVIEWGRD
- Reorder Maintainer — Java Template: MNTJAV-SRT — Preview Template: PREVIEWGRD
- If you use a custom Java Template, leave Template 6 blank. If you do not, or if you input an incorrect Preview Template, you will see a 500 error instead of the application preview.
- Be sure to note each of the values for Templates 1 through 4. Each value associates back to a file name in m-powerproddatatemplatesreports.
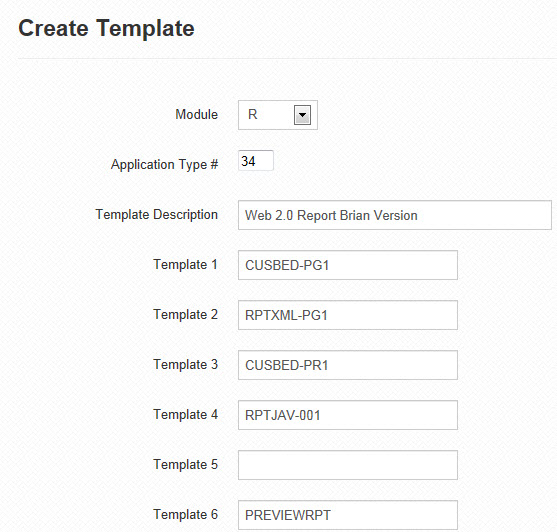
- Let’s register your new template. Go back to Manage Templates & Click “Copy” for the Report Template.
- Be sure to give your new template a unique Application Type #.
- Rename the Template by changing the Description value.
- Now you have to decide which mrc shipped templates you would like to change and which you would like to continue to use. Most developers decide they would like to change both the prompt page and the output page. If you understand Java, you are encouraged to make your own Java template (Template 4). However, this example will only demonstrate the technique for updating the HTML templates (Template #1 & #3).
- Rename Template 1 and Template 3, making sure to keep the value at 10 characters long. For now, replace RPT with CUS & replace HTM with your initials. Replacing RPT with CUS ensures that no future template shipped by mrc will overwrite your custom template.
- Click “Accept”. Congratulations! You have just registered your new template to m-Power.
- Notice that 5 Template files are used in this Template:
-
Understanding m-Power Templates
-
- m-Power templates are written with the Freemarker template language. It is recommended that you have a basic understanding of Freemarker. Basic Freemarker documentation can be found here.
- More extensive Freemarker documentation can be found here.
- Using Freemarker within the template allows you to create loops and work with variables. When an application is compiled, the Freemarker code in your template is parsed into your final HTML page. It is quite common to have numerous If/Else loops in the template, but then the generated HTML has none. The reason for this is that the If/Else loops were parsed at compile time and the result set is what ended up in your generated HTML file.
- A unique and powerful aspect of using Freemarker within our templates is that the Freemarker logic is actually parsed twice: Once at compile time & once at run-time.
- Common Question
- What can I do if I do not want a Freemarker statement parsed at compile time? I only want it compiled at run-time!
- Answer: That’s easy! Simply wrap your statement like this: ${r”STATEMENT”}.
- For instance, this is determined at compile time:
<!--<#if page.advancedSort == 1> --> - Whereas this is determined at runtime:
<!--${r"<#if page.advancedSort == 1>"} --> - In essence, by wrapping your Freemarker statement in ${r”STATEMENT”}, you are telling the m-Power compiler to ignore the Freemarker statement at compile time by simply unwrapping the freemarker statement contained within ${r””}. In this way, the code will be unwrapped and then handled at runtime for your end user.
Creating the Template
-
- Now that the template has been tested in m-Painter and registered to m-Power, we need to actually create the template on the server. Back on the m-Power server, copy RPTHTM-PR1.ftl and RPTHTM-PG1.ftl. Rename the copies CUSZZZ-PR1.ftl and CUSZZZ-PG1.ftl (Where ZZZ are your initials).
- Open your newly created CUSZZZ-PG1.ftl file (Report Output) in a text editor.
Note: This author recommends the text editor “notepad++”, as it allows for multiple files to be opened at once and provides syntax highlighting.
- Starting with
<!--BEGIN_EXT_FILE-->down to<!-- END_EXT_FILE-->is the contents of your XML application properties. While you can remove unwanted XML properties, or even change certain properties to better meet your needs, you are not able to create new application properties. - Starting with and going to the end of the document contains all of the HTML mark-up within your template. Any changes made will be seen on all applications compiled with this template.
Tips and Suggestions for Success
- Include additional plugins, such as jQuery. If you are familiar with these types of utilities use them! They are often lightweight, scalable, tested, and serve specific purposes — all great reasons to use them within a template! Simply add an additional script line to the head of your template to include the necessary logic. See Dealing with Run-Time Files below for more information.
- Experiment — Make small incremental changes. The best way to create your own templates is to smart small; make one or two changes at a time, then re-compile and overwrite the existing HTML/XML. When you run your application, you will see your new changes. If you like what you see, keep going! If not, undo your last few changes and try something else.
Dealing with Run-Time Files
- Often times, when creating a new template you will need to call additional files at run-time (.CSS files, images, .JS files). We recommend creating a folder in: m-powermrcjavamrcclassestemplate_name (Replacing template_name with your template name or description).
- By putting all of the files for each of your templates in one place, it will make organization much easier and will help streamline the process to package your template and move it to production.
- When referencing run-time files from your template, use relative links. For instance, if you wanted to call a .js file from your template, you might use this line within your HEAD section:
<script type="text/javascript" src="/mrcjava/mrcclasses/folder/filename.js"></script><– (Replacing folder and filename with appropriate names).Creating a Template Image
-
- Once you register your template to m-Power, you can select it when building applications. However, if you don’t make an image for the template, you will see the image below in the interface.

- To create your own image, you must create a .jpg file that is exactly 250px x 181px.
- The image must be moved to this folder: m-powermrcwebguiimagetemplates.
- Lastly, the image name must be the exact description of your template, removing all spaces and punctuation from the description. For instance, the template called Web 2.0 Heat Color Table must have an image sized 250×181 with the file name of Web20HeatColorTable.jpg. If the file name does not match, no image will appear.

Packaging your Template
- After customizing and testing your template, it will be ready for packaging. Packaging allows you to share your work with others in the m-Power community. Here is how to package your work:
- On your desktop, create a folder called m-Power.
- Within this directory, create the following folders and subfolders:
- mrcjava
- mrcclasses
- mrcwebgui
- image
- templates
- image
- proddata
- templates
- report (or other application type)
- templates
- User Created Docs
- mrcjava
- Place any run-time files and their folder(s) in the /mrcjava/mrcclasses folder.
- Place the image template in the /mrcwebgui/image/templates folder.
- Place the template(s) in the /proddata/templates/report(or other application type) folder.
- Place your documentation along with a screenshot of the Manage Templates screen in the /User Created Docs folder. This step is necessary so others users know how to register your template to their m-Power environment.
- Once all of these files are in the appropriate location, compress the m-Power folder on your desktop into a .zip file. You can do this in some operating systems by right clicking on the m-Power folder and select Send to -> Compressed folder.
Note: It is important to create this folder with the name m-Power so when other users extract your work, it will automatically be merged into their current environment.
Moving to Production
- Your template will stay on the development side of your environment. However, any run-time files that your template may reference will need to be moved over to your production environment. Generally speaking, only objects from within the m-powermrcjava folder are candidates to be moved into production.
Publishing your Project
- Now that you have created your package, it is time to share it with the world! Publishing your project just takes 2 easy steps.
- Create an mrc Tech Blog Post.
- Head over to the Tech Blog.
- Click the Guest Posting Page link to add a post.
- Fill out your name, email, and post title.
- Use the post title and post content to explain your project.
- Be sure to upload a screenshot of your finished product as well by utilizing the insert/edit image button.
- Choose the appropriate category and complete the image verification.
- Click the “Publish” button.
- Upload Project
- Now that you have created your Forum post, it is now time to upload your project to our system.
- Current mrc customers should access their Customer Portal to register their project.
- Be sure to select the Project Type & Sub-Type.
- Upload your project & up to 3 screenshots of your finished product. Each image needs to be 300px by 250px.
- If there are any limitations or support constraints, be sure to list them in the appropriate areas.
- Use the Price field to list any licensing constraints.
- If you have created Demo applications, you can link to up to 3 examples.
- Use the m-Power Forum URL to provide a link to the post you made in Step 1.
- Use the External Project URL if you utilized any external code that you feel needs to be referenced for others to see.
- Create an mrc Tech Blog Post.
- That’s it! Your project will be available to all others. Thank you for your contribution to our user community!
Other Important Notes
- Template creation is geared towards developers who are very familiar with the m-Power product.
- mrc offers training classes to assist you with all of your template creation questions. Please be advised that both template creation and custom template support are not handled by the mrc Hotline.
- Have a specific need for an m-Power template, but don’t have the time to write it yourself? mrc offers consulting services to create your perfect template to meet your specific needs!