Data Upload Maintenance Template
Jump to:
Template Specific Notes and Instruction
Runtime Walkthrough
Template In-Action
Application Properties
Web Parameters
The Data Upload template can be used to allow end users to upload Excel files directly into the database. End users can either upload data directly from an Excel file, or copy and paste it into an onscreen text area for ease of use. At run-time, users have various options including which datasheet to upload, defining whether the first row of data should be ignored (in case the dataset contains column descriptions), and selecting whether to replace or append records to the dataset. Applications created with this template will display a status window to track the progress of the upload, and these applications will display any errors in the upload process so the end user is aware of what data was not successfully submitted to the database.
Notes on Creating a Data Upload Maintenance Application
You can create the table using m-Power or any alternative method way you feel comfortable creating database tables. Once completed, ensure that the table has been registered to m-Power.
Note: Tables created with m-Power can be easily modified within m-Power. For this reason, it is recommended to create your data table with m-Power.
Template Notes
Application Settings
Program Name: This will be the application’s number. By default, m-Power uses the letter M (Maintenance) followed by a five digit number.
Template: You can select a template by scrolling through the available templates. The templates define the general layout and functionality of the resulting application. This section will list all the available maintenance templates; you will see a small screenshot of what that template looks like at runtime. Learn more about templates.
Data Selection
Here you will see/modify the table you have selected for your application. Here you can create or modify joins to other tables as well. When tables are selected, only the primary table can be modified, by default. This is done to protect developers from accidental cascading changes. This behavior can be modified within the application properties.
Sequencing
When building maintenance applications, a developer’s sequencing selection is analogous with selecting a Primary Key. This selection will tell m-Power how this table is unique.
Note: The sequence keys in this template must be the first fields listed in the application. See the Field Settings section for more information.
Field Settings
Note: The sequence keys are required to be listed first in the field settings and the order of the fields listed in field settings must match the order of the fields listed in your Excel file. If the order is not correct, use the re-order tool to fix it.
Here you will find the settings for all the fields in the application. The options are:
Field Name: This is the same name the field has in the table.
Table: The name of the table where that field exists.
Field Description: This is the text that will appear in the column header for that field, you can modify this field to suit your needs. This field will populate with the field description from the table by default, but it can be customized at the application level.
Type: A drop down list that allows developers to designate whether a field is to be displayed (visible, but not edited on the database), hidden (no action), or updated. There may be situations where a field is needed for calculation purposes, but the field does not need to be displayed at runtime. Note: Sequence keys must be set to update to ensure your application functions properly
Size: This displays the length of a field. If a field has a length consisting of two numbers separated by a comma, the first number will be the integer length and the second the decimal length of the field.
Lowercase: This option determines whether or not an alpha field can be submitted to the database with lowercase letters. If this is set to "no," the field will be converted to uppercase when it is submitted.
Record Selections
Record Selections are not supported with the Data Upload Maintenance template.
Calculations
Calculations are not supported with the Data Upload Maintenance template.
External Objects
External Objects are not supported with the Data Upload Maintenance template.
SmartLinks
SmartLinks are not supported with the Data Upload Maintenance template.
Runtime Walkthrough
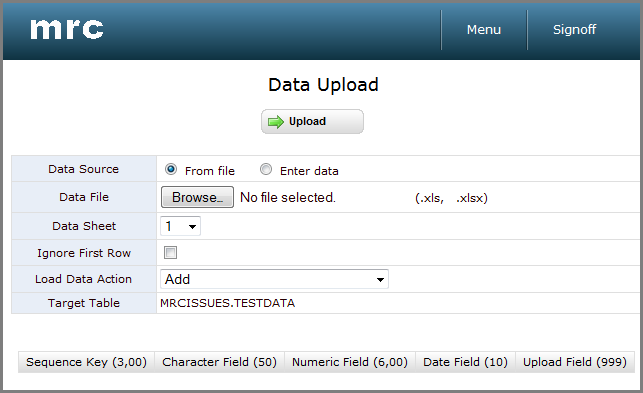
Like its name, the Data Upload Maintenance template uploads data to the database. To use this application, begin by selecting whether the data will come from an Excel file, or be entered in spreadsheet format. We will select ‘From File’ for this example, and then browse to locate the file. Then we select which data sheet to upload, and specify whether or not to ignore the first row. This option is often selected when the first row contains header information. Next, we will select the proper ‘Load Data Action’ from the dropdown. The last row in this table, which is display only, identifies the table that the data will be loaded into.
Alternatively, we could have selected to ‘Enter Data’ in spreadsheet format. This forces a text box to open, in which data can be directly pasted. After doing so, select the delimiter for the data, and continue selecting the options as specified earlier.
Now we are ready to upload the data. After clicking upload, a message will show that the data is being uploaded. Once the upload has finished, text will appear that describes whether the upload has been successful.
Template In-Action
The Data Upload Maintenance template only supports the PC presentation layer.
Application Properties
When accessing the Application Properties, a popup window will open with multiple tabs; let’s go through each of the tabs:
Web Parameters
Created: September 25, 2013 | Modified: February 15, 2019