Row Level Security
Jump to:
Creating the Security Table
Creating the Security Application
Implementing Row Level Security
Video
Web Parameters
Row Level Security is a highly flexible technique for controlling which records are returned based on the current user. Implementing row level security is a three step process. First, you must create a table that contains security credentials. Second, you need to create a retrieval over this table, using the Row Level Security template. Lastly, you must integrate the security retrieval with the application you wish to secure.
Creating the Security Table:
The table must contain three fields. One field will hold user profile information, another will contain values, and a third will contain data regarding the relationship between the user and the values. When naming your fields, do not name the user profile field USER. This word is reserved within Java. Valid relationship values are:
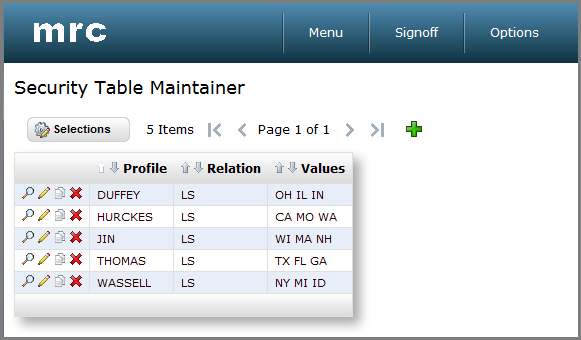
You most likely will want to build a maintainer over this table.
This table has been set up so that user Duffey has the credentials to view all values in the list of OH, IL, and IN. Conversely, user Hurckes can only view values related to CA, MO, and WA. Once your security table has been created, you are ready to create the Row Level Security application.
Creating the Security Application
In order to implement Row Level Security, you must create a retrieval over the table you just created. This retrieval must be created using the Row Level Security template. Applications created with this template are expected to run behind the scenes, and not in the browser.
Note: The security application must be created in the same data dictionary as the application it will secure.
Application Specifications
Application Settings
Program Name: This will be the application's number. By default, m-Power uses the letter I (Inquiry) followed by a five digit number.
Select Only Matching Records: Select either 'No', for a left outer join, or 'Yes' for an inner join. A left outer join will return all records from the primary table along with matching records from the secondary tables. An inner join will return records from the primary and secondary tables only where matching records are found.
Template: You can select a template by scrolling through the available templates. The templates define the general layout and functionality of the resulting application. This section will list all the available maintenance templates; you will see a small screenshot of what that template looks like at runtime. Learn more about templates.
Data Selection
Here you will see/modify the table you have selected for your application. Here you can create or modify joins to other tables as well.
Sequencing
Sequence your application by the field containing the user values.
Field Settings
Here you will find the settings for all the fields in the application. The options are:
Delete: You can delete fields by clicking the checkbox and clicking Accept. If a field has a red circle with a cross line, that means that the field is being used somewhere else in the application (sequence, calculation, etc.), and, due to this dependency, is not available for deletion.
NOTE: deleting a field will remove the field from the application only, the table will be unchanged.
Field: This is the same name the field has in the table.
Table: The name of the table where that field exists.
Field Description: This is the text that will appear in the column header for that field, you can modify this field to suit your needs. This field will populate with the field description from the table by default, but it can be customized at the application level.
Display: A radio button allows developers to display or hide the field from the output page. There may be situations where a field is needed for calculation purposes, but the field does not need to be displayed at runtime.
Length: Here you can modify the length of the field. m-Power will only allow developers to shorten the length of the field, shortening a fields length will truncate its data. For example, if a field is 10 alpha and it is changed to 5 alpha, now only the first 5 characters will be displayed. The same principle applies to a numeric field, if a numeric field is 8 digits long; changing it to 4 digits long will only display the first 4 digits, and leave out the rest of digits.
Decimals: For numeric fields, you can modify the amount of decimal digits. A numeric field will have the option of changing its decimal length, alpha fields does not have a decimal option, developers can use this as an indicator to check if a field is a numeric or character type.
Numeric Format Code: For numeric fields, you can modify the way the numbers will display, this includes displaying decimals or not, how to display negative numbers, etc. Multiple formats are built in for developers to use, shall you need a different format code, m-Power allows developers to create their own User Defined Format codes; these codes will add logic for common types of fields such as: Currency, Time, or Dates. Accessing the User Defined Format Codes from the Admin section will also allow developers to modify current codes. Learn more.
Note: Do not confuse the User Defined Format Code with the User Defined Functions (UDF). The latter is a feature that allows developers to create or incorporate programing functions into m-Power. Learn more about UDFs.
User def: This feature has been deprecated.
Record Selections
Record Selections can be created over any database fields. These are the options:
Relation: A drop down allows you to select a relationship for the filter.
Value: This is the value to compare against. The options are:
Constant Value: A constant value allows you to hard-code any given value into a selection. This value cannot be modified by the end-user at runâ??time.
Application Field Value: Developers have the option of comparing a value from one field to a value from another field within the same record.
And/Or: When creating multiple record selections, you have the option to set them as and or or Example: selection A and selection B will display only records that match both selections. Selection A or selection B will display records that match one or both selections. Learn more.
Calculations
Calculations are a very powerful feature of m-Power; with calculations, developers can create logical fields that will apply to the current application only. This can be used to include SQL code in a field, such as cast a numeric field as character, create date conversions, inserting the current date and time, and much more. Learn more. In Row Level Security applications, calculations are often used to create the relationship field, without needing to alter the table.
External Objects and SmartLinks
External Objects and SmartLinks are not supported in the Row Level Security Template.
Application Properties
When accessing the Application Properties, a popup window will open with multiple tabs; let's go through each of the tabs:
Program Options
edit_type: This property specifies whether this application can be edited through m-Painter (WYSIWYG and text editing), or through text editing only.
SQL Statement
secureby: m-Power applications can be secured against username or session ID. Click here to learn more about this feature.
sql_statement: Developers can specify an SQL statement with this property to override the default SQL statement created by the application.
Override Properties
This section allow developers to override the default error messages , by selecting the error message you wish to customize, and then simply modifying the Value section to whatever you would like your message to say at runtime in place of the default message. More Information
Implementing Row Level Security
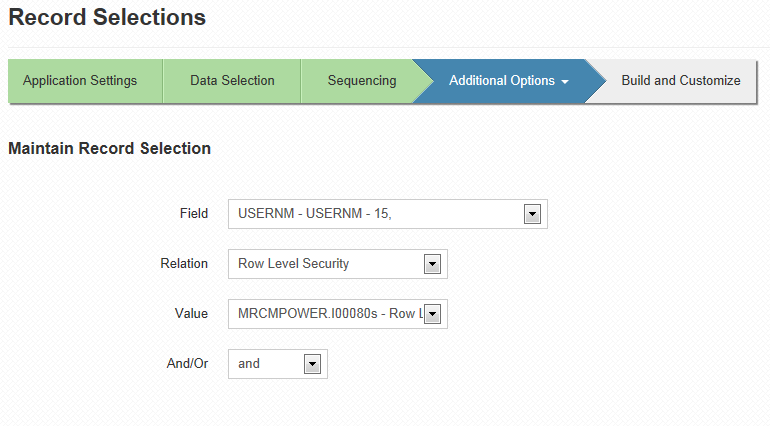
Once you've created your security table and retrieval, all that is left to do is to integrate the security retrieval with the application you wish to secure. To do so, open the application and navigate to the Record Selections specification.
For the field value, select the field in your application that contains user information. Select 'Row Level Security' from the relation dropdown. The value dropdown list will populate with all row level security templates that have been created in this dictionary. Select your security application and click accept.
Once you have added your record selection, you will need to recompile your application. However, you do not need to overwrite the HTML or Application Properties. Your application should now be set to use Row Level Security!
Video
In this brief video I will show you how to apply Row Level security to your applications.
Row level security is a great feature that allows you to specify what records your users can access based on their login credentials. This gives you great control over who can access the records and what records they can access.
Once the security table and the Row Level Security retrieval have been created, you are ready to apply the Row Level security to your application.
As you can see, I have a report listing all the customers; there are over two hundred records listing customers from many different States and regions. I am assigned to work only with customers from the Midwest, which includes these four states: OH, IL, IA, and IN. There is no need for me to see records of customers from other states.
In the security retrieval I had filtered that my user â??Zarateâ?? should only be able to access the records where the State is equal to any of these: OH, IL, IA, and IN.
After compiling your application, click Record Selections. From the Field drop down, select the field that you want to control. In my case the field is the Customer state.
From the Selections drop down, select the Row Level Security. From the Values drop down, select the retrieval containing the users and filters for this application. In my case the retrieval 20 contains the filters of what records I can access depending on the user.
Recompile the application without overriding the HTML or Properties. Now, when I run the application I am only allowed to access those records that match my filter on the retrieval.

