How to Build Custom ERP Features Without Modules or Vendor Fees
Full Transcript of Video
In this video, I'll show you how you can make your ERP system better fit your business needs and save a lot of money in the process. You'll learn how to add custom features to your ERP without altering the system, reduce the amount of ERP licenses you need, save money on ERP customization, avoid pricey ERP modules, build anything you need over your ERP data quickly and easily, and gain more control over your ERP data.
We're going to do all this using the m-Power Development Platform. I'm going to give you a demo of m-Power, but before I do, let me explain how it helps our customers do all those things I just mentioned.
m-Power is a low-code development platform that lets you build custom web applications over most any database. It works so well with ERP systems for three big reasons.
First, it doesn't change the ERP itself, it only interacts with the ERP's database, of course, with granular security controls so you can manage user access and permissions.
Second, m-Power has no limits or fees for users, applications, or data. So you can build and distribute applications to all users without extra fees.
Third, applications you create can be white-labeled and customized however you want, to perfectly fit any interface.
When you combine those three points, you have a way to build any custom applications you want over your ERP data that look and feel like they're a part of your ERP, without paying any user fees.
Add custom features to your ERP without altering the system. Let's say that you need a way for employees in your company to submit purchase orders from their smartphones, but you don't have that capability in your ERP system. You can build a purchase order request application with m-Power that ties into your ERP database and lets those users submit orders from their smartphones, complete with a workflow process for approvals. That's just one example, but you can build anything, like forms, inventory management, reporting, you name it.
Reduce the amount of ERP licenses you need. Many users only need a small fraction of your ERP, right? Take our previous example, your users on the shop floor might only need to input and retrieve data from just one small section of your ERP system. But, you still need to pay for a full ERP license, even if those users don't need much access. You can eliminate those licenses altogether if instead, you give those users a web app that can read and write to your ERP database. You'll still give your users the capabilities they need, while securely managing data and user access, without using an ERP license. And remember, m-Power has no user fees, so you can deploy these applications to anyone without extra fees.
Save money on ERP customization. Typically, when you want an ERP system to be customized for your business, you pay the vendor for customizations, which can get really expensive, and creates more risks that something will break if you ever need to upgrade. With m-Power, you're not messing with the ERP code itself, so it's safer, and you can create as many custom features or applications you need, and make them look and feel like a part of your ERP.
Avoid pricey ERP modules. Rather than purchase an entire, and expensive, module to get specific capabilities, why not just build it? m-Power can replicate the features found in most ERP modules very quickly, often faster than it takes to deploy an ERP module. The best part: It's custom to your business needs.
Build anything you need over your ERP data, quickly and easily. That's one thing our customers really talk about, is the fact that in the past, they'd want certain features or they'd have users requesting specific things, but they couldn't do it, until they got m-Power. Now, they can build anything they want quickly, and that's huge. They go from telling people, "oh, that's not possible" to delivering custom applications in days. Some even take a proactive approach and say to their users "We can build anything now, is there anything you've been wanting?"
Gain more control over your ERP data. m-Power gives you more granular data controls than what exists in many ERP systems. And that's very important if you're letting users write to your ERP database. You need to have control over who can read and write, and where they can do so. You can even control what applications and data each user can see, even down to the row level, whereas you might not have those options native in your ERP system.
When you put all that together, you have a way for your ERP system to perfectly fit your business needs while maintaining security, without the risk of breaking anything, and while saving a lot of money in the process.
Now that you understand how it helps, I want to quickly show you how it works. So, I'll login to m-Power here and walk you through a build process.
I'll take the example I mentioned earlier, and build a basic purchase order form and workflow, where employees in my fictional manufacturing company can place purchase order requests, which will then get sent to managers for approval, all of which ties into our ERP data.
Building any application in m-Power is a three step process. In the first step, I name it and choose the template, and templates dictate what the application can do. I want to create a form that lets users add purchase orders to my database, so I choose the single row web form, which includes those UI components.
Now, I need to tell m-Power which database table we'll be working with, and this is where you'd have a list of your ERP database tables that have been registered in m-Power. I've set up a few demo tables in here. So, I'll choose this table and then grab all of the fields. I could join to other tables pretty easily, but I don't need to do that this time.
And now, I'm really all set with the build process. There's a lot more I could do, like add filtering, set up calculated fields, add custom logic, and a lot more, but I'm just building right now as I don't need to do any of that. This is just a basic application, but I hope you're getting a feel for how easily you can build applications over your ERP data.
Alright, it's built now so let's check it out. Not much to it right now, I have a simple form that I can submit a new purchase order into our PO table. Let's jump into m-Painter and touch it up a little.
m-Painter is m-Power's visual editor, so I can come in here and change the look and feel how I want and make it look like my ERP system, I could also add different components, pull data in from other places, really anything. This time, I'd just like to make this form a little better.
First, I'd like to add a dropdown here on this product input. I don't want people typing anything in, as that would lead to data quality issues if they misspell a word or request a product they can't order. So I'm creating a data model over my products table, which will let users select a product that they'd like to order. And the nice thing is, once I have this data model in here, I can re-use it across any application. So the more you build, the easier it becomes.
And once that's set up, I can use it to power my product drop down list here.
Another thing, I'd like to make the PO Number hidden, as it's auto generated and doesn't need to be seen.
This status field can only be one of three options, so I'll change it to a button, and this time I'll create a quicklist. These quicklists are nice if there are only a few options to choose from, and you know exactly what they are. In this case, a request can be pending, approved, or denied. And, like the data model, I can reuse this quicklist in any application.
Now, I'd only like to show this status option to managers, as they should be the only ones who can approve or deny a request. I can easily set that up here, where I can make this field conditional based on the user role, in this case, it will only show if the user is a manager.
Finally, one other conditional element. I only want to show the declined reason input if the status has been changed to denied, so I can set that up here. Now, this input will only show if the status is changed to denied.
Let me toggle security over here, so we can test the role-based conditional elements. I have two users set up. I have a basic user and the other is a manager. But don't worry, you don't have to set up each user here, you can use whatever authentication method you're already using, like Active Directory, OAuth, or SAML. It works with what you have.
If I run the application I have to login now, so let's login as a regular user first. There, we see the form, I have my dropdown over here, and I cannot see the status options, which is what we want.
Now, let's logout and then log back in as a manager. You see that I have the status field visible, and if I were to change that to denied, the reason for denying input shows up. So, all of that is working well.
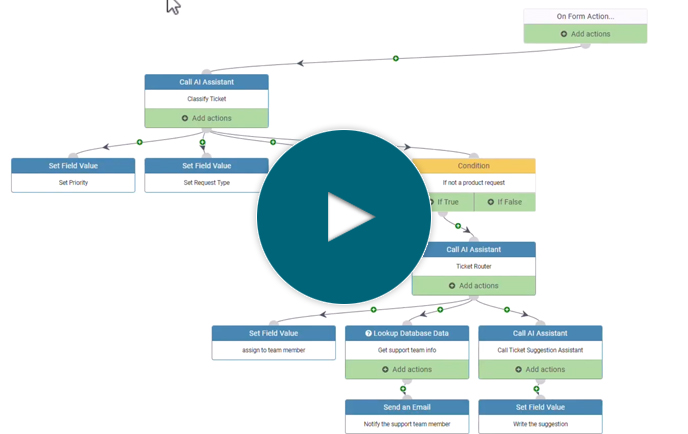
We have that form working. It will let users create purchase order requests and also has a way for managers to approve or deny them. Now, let's jump into the workflow side and set that up.
In m-Power's workflow designer, I can set up all types of automations. First, I'll jump into the statuses side of things and add our status options, which are pending, approved, and denied. These are all mapped to my status field, so when that changes, it will trigger status changes in the workflow side. I'm setting these up so I can trigger workflow elements based on status changes.
Now in the workflow side, the first thing I want to do is connect this to a list of my users. I'm doing this because this list has user and manager email addresses in it, and I'll need to use those later on in my workflow.
Next, I'll create a trigger when the form is submitted, which means that an employee has created a purchase order request. When that happens, I'd like to notify the manager in charge of purchase approvals, so I'll send an email. I can use that manager email here, and then write up a quick subject line. Next, I'll write a basic email, and I'll just give them a link to that form, but can add a database field here for the PO number so it sends them to the right one. Since they're the manager, they'll see the status options and can approve or deny it.
What happens when it gets approved? I'd like to notify the user that submitted the request, and I can do that with a simple email. I'm speeding through this since it's the same process, but I'm just letting them know that the request was approved. Then, let's say we need to send that approved request to our purchasing department, and let's say that they get notified when a new order is added to the purchasing table, so let's post this order to that table. I'm just creating a very simple example to give you a feel for how easily you can create anything over your ERP data. Obviously, your needs will be different, but m-Power makes it easy to build anything, completely custom to your needs.
Now, what happens if the request gets denied? Let's notify the user again, and send them an email. This time, let's include the reason it was denied in the email so they know and can follow up with the manager if needed.
We have a very simple workflow to handle our purchase order requests. Now, I'd like to give our users a list where they can see their purchase order requests, edit them, and even delete them. I'll be able to use this form I just made in that application to pull everything together.
I've already started building this out, and it's the same process as before, only that I'm building over my users and products tables here. Then I'll go into the filters and add row level security by username. What this will do is let all of my users login to this application, but only see their data.
And that's it, so we can build now.
You see that it's the same process as before, just using a different template. That's the great thing about m-Power, the process stays the same for nearly everything you build, and then of course you can customize it however you want.
Now that it's built, let's jump into m-Painter and touch it up.
First, let's change the heading up here and then pull in the user's first and last name, which I can do using these available features over here.
Next, I'll remove some of the columns in my table, as the user won't need to see all of these. There, that should be good.
Next, I'll add a button to the right here, so users can add new purchase orders, and let's change the icon in here.
Now, I'll add a smartlink to this button that links out to the form I just created, and m-Power is smart enough to know how to link them together. I'll make sure that this form is on Add mode, which means it will only add new records, and then I just need to set it up as a popup box, and I'm set.
Next, let's give them a way to update or delete each one, and I'm just adding a new column and putting a pair of buttons in there. I'll smartlink them together in the background and skip ahead since it's the same process as before, the only difference is that I'm setting the form mode to update for the first button and delete for the second.
I've added those buttons. Now, one more thing, I'll change the color of the delete button to differentiate them a little.
One more thing I'd like to do here. I'll add a row up above this table, and will split it into 3 containers. I'm doing this so I can add some nice stat widgets up here to give our users a quick glance at their purchase orders and see how many are approved, how many are pending, and how many have been denied. I have those in there, but let me make this one on the end have a red background, because this will be for the ones that were denied.
Now, we just need to delete this number in here and click this 'total and percentages' button, and then build or choose a data model. I premade the 3 data models for this, and all they do is look at the purchase orders table and count up the purchase orders for each status. This one that I've chosen counts up the approved statuses, and because of our row level security, it will only total the approved POs for this one user.
I'm going to do the other two in the background and skip ahead since it's the exact same process each time.
Alright, I'm all done. Now, we can save this and run it. I'll login as our user here, and there you have it. We have our user name up here, we can see our stat widgets up here, and we have our list of purchase orders down here. I can even edit one of them if I click this button, or delete it with this one.
Let's test this workflow really fast. Suppose I need to submit a new purchase order. I just quickly fill out this form, the dropdown makes it easy to pick what I want, I'll just give a quick reason, and fire it off.
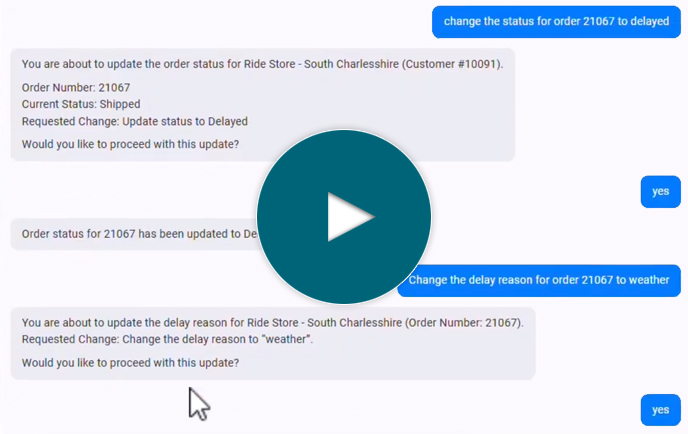
Now, let's open up our manager's email to see if they received it. And there it is. As a manager, I can login to that form, review the information, and approve or deny it. I'll deny this one just so I can give a denial reason down here.
Once it's been denied, let's open up our user's email account and see if that went through. There, we have an email and it explains why the request was denied. If I look at this user's list of purchase orders here, you'll see that this one has been denied.
And that's it! I could do so much more here and really build out any type of custom application I need over my ERP data, but I hope you see how easy m-Power makes it. You can build anything you need over your ERP data, and distribute it to all of your users, all without paying user fees.
If you'd like to learn more about m-Power, visit our website at mrc-productivity.com. Thanks for watching.
Learn how m-Power can help you
Sign up for a free trial
More Videos
Sort videos by category using the options below